

You want a showstopper dessert but don’t want to turn on the oven? Same. That’s why this ice cream theme cake is my go-to when I need something impressive without the sweat.
It’s not really a “bake” – you just spend 20 minutes layering and crushing cookies, then let the freezer do the rest. Perfect for birthday surprises or “I forgot about the potluck” emergencies.
1. Allergens
This recipe contains dairy (ice cream, butter, whipped cream), gluten (cookie crumbs), and soy (depending on the cookies). If you serve it to a crowd, warn your friends – nobody wants an allergic reaction as a party favor.
For a dairy‑free version, use vegan ice cream, plant‑based butter, and coconut whipped topping. For gluten‑free, swap in GF chocolate sandwich cookies (many brands work great).
2. Ingredient notes & substitutions
Softened ice cream is the secret – leave it on the counter for 15 minutes until it’s spreadable but not soupy. Store‑brand vanilla works perfectly; chocolate, strawberry, or coffee are also delicious.
No chocolate sandwich cookies? Use graham crackers or shortbread cookies, but add 2 tablespoons of cocoa powder to keep that “ice cream cake” vibe. Melted butter binds the crust, but coconut oil (refined, no coconut taste) works for a dairy‑free crust.
3. Pro tips
Line your pan with parchment paper (two overlapping strips) so you can lift the whole cake out easily. A springform pan is great, but a regular 9×9 or round cake pan works too – just leave the paper hanging over the edges.
Press the crust firmly with the bottom of a measuring cup. If it’s loose, slices will crumble everywhere. And before adding the ice cream layer, freeze the crust for 10 minutes so it doesn’t turn into mush.
4. Storage & make-ahead (fridge/freezer)
This cake lives in the freezer. Wrap it tightly in plastic wrap and then foil – it stays fresh for up to 2 weeks. Don’t store it in the fridge, or the ice cream will get icy and sad.
To make ahead, assemble completely (including toppings) and freeze. Pull it out 5 minutes before serving so it slices easily. If you want individual portions, slice the frozen cake and wrap each piece – perfect for grab‑and‑go dessert emergencies.
5. Serving suggestions
Serve a slice with warm hot fudge sauce and a little extra whipped cream. It’s also amazing with fresh berries or a sprinkle of sea salt on top.
This is a dessert all on its own, but if you’re building a party menu, pair it with coffee, milkshakes, or a fruit salad to cut the richness. Kids will happily eat it for breakfast the next day – but I’m not supposed to tell you that.
6. “Use your leftovers”
Leftover crushed cookies? Sprinkle them over yogurt or brownie batter. Extra melted butter? Save it for popcorn or sautéing veggies (weird but tasty)..
If you have leftover softened ice cream that didn’t fit in the pan, pour it into a small container and refreeze – now you have a personal ice cream snack. Leftover whipped cream turns into coffee toppers or fruit dip for the next two days.
7. Common mistakes & how to fix them
Mistake: Ice cream is too hard to spread. You left it out for 5 minutes instead of 15. No problem – microwave it for 10 seconds (yes, really) and stir. It’ll soften right up.
Mistake: Crust sticks to the pan. You forgot the parchment paper. Run a knife around the edge, then dip the bottom of the pan in hot water for 10 seconds. The crust will release after a gentle tap. For next time: parchment paper. Not optional.
8. Variations by diet or flavor profile
Vegan: Use dairy‑free ice cream (like oat or coconut based), vegan butter, and coconut whipped cream. Most chocolate sandwich cookies are accidentally vegan – check the label.
Lower sugar: Use no‑sugar‑added ice cream and a crust made from crushed nuts plus a little honey. Chocolate peanut butter theme: Use chocolate ice cream and add a layer of peanut butter (warmed up for drizzling) between the crust and ice cream.
9. “Why this recipe works” / The science
The cold temperature keeps the layers distinct – the fat in the ice cream stays solid, so the crust doesn’t get soggy. Pressing the crust compresses the crumbs, creating a barrier that butter seals.
Softening the ice cream before spreading prevents it from shattering. If you try to smash a frozen brick into the pan, you’ll get chunks instead of a smooth layer. The 15‑minute rest lets the ice cream crystals relax just enough.
10. Frequently Asked Questions (FAQ)
Can I use homemade ice cream? Yes, but use a custard‑based one (more fat = less icy). Let it soften the same way.
How long does it need to freeze after assembly? At least 4 hours, but overnight is better. Don’t rush it – a soft cake will fall apart when you slice.
Can I make this in a loaf pan? Absolutely. It’ll be taller; just reduce the crust to 1 ½ cups and check the freeze time (add an extra hour).
11. Call to action (comment, share, subscribe)
I’d love to see your ice cream theme cake – drop a photo in the comments or tag me on social. Share this recipe with that friend who always brings chips to the party. And if you want more no‑bake desserts, hit subscribe so you never miss a lazy day miracle.
Conclusion
So there you go – 20 minutes of easy assembly, then the freezer does the heavy lifting. You get a cake that looks like you spent hours on it, but really you just crushed cookies and spread ice cream.
Make it for a birthday, a summer cookout, or a random Tuesday. Slice it up, add a glob of hot fudge, and pretend you’re a professional pastry chef. Now go get that ice cream out of the freezer so it can soften – I’ll be right here waiting for your success story.
Recipe Name: No-Bake Ice Cream Theme Cake
Servings: 10
Estimated Cost Per Serving: $1.50
Prep Time: 20 minutes
Cook Time: 0 minutes
Total Time: 4 hours 20 minutes (including freezing)
Course: Dessert
Cuisine: American
Calories Per Serving: 450
Diet: None
Difficulty: Easy
Ingredients
For the crust:
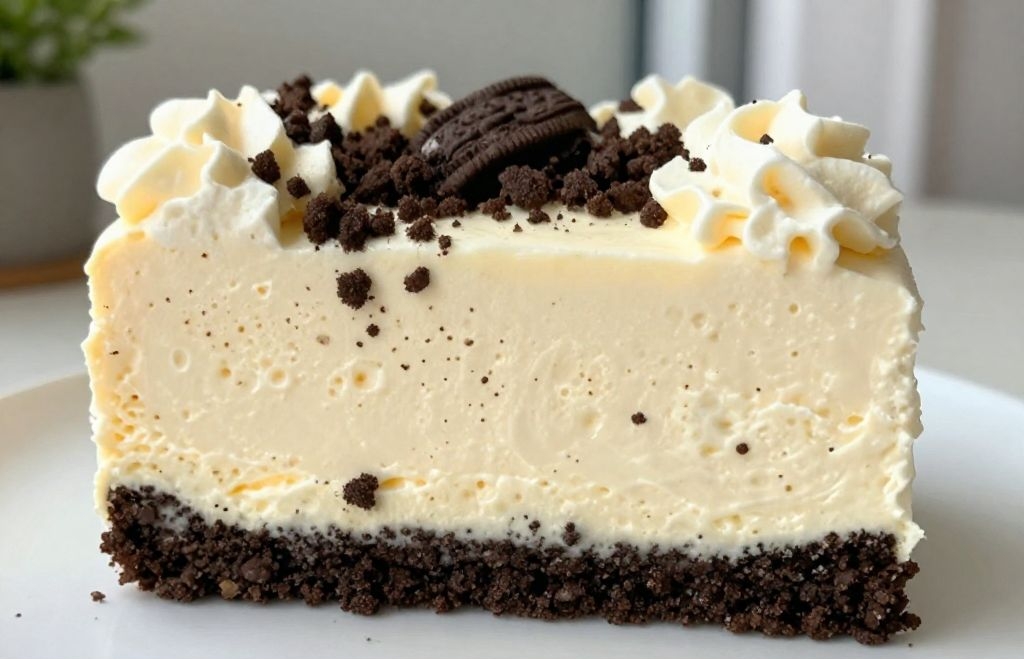
- 2 cups (200g) crushed chocolate sandwich cookies (like Oreos)
- ¼ cup (56g) unsalted butter, melted
For the ice cream layer:
- 1.5 quarts (1.4 L) vanilla ice cream, softened
For the topping (optional but awesome):
- 1 cup (240ml) whipped cream or thawed whipped topping (like Cool Whip)
- ¼ cup rainbow sprinkles
- ¼ cup hot fudge sauce, warmed
Instructions
First, line an 8×8 or 9×9 square pan (or a 9‑inch round springform pan) with parchment paper, leaving overhang on two sides. This makes lifting the cake out way easier.
Next, in a medium bowl, mix the crushed cookies with melted butter until it looks like wet sand. Press the mixture firmly into the bottom of the prepared pan. Use the bottom of a measuring cup to really pack it down. Freeze the crust for 10 minutes while you soften the ice cream.
Take the softened ice cream and spread it evenly over the frozen crust. Smooth the top with a spatula. If you want a second flavor, layer half the ice cream, add a drizzle of fudge, then add the rest – but keep it simple the first time.
Cover the pan with plastic wrap and freeze for at least 4 hours, or overnight.
When ready to serve, lift the cake out using the parchment overhang. Let it sit at room temperature for 5 minutes, then slice with a sharp knife (run the knife under hot water between cuts for clean slices).
Top each slice with whipped cream, sprinkles, and a drizzle of warm hot fudge sauce. Serve immediately – and watch it disappear.