
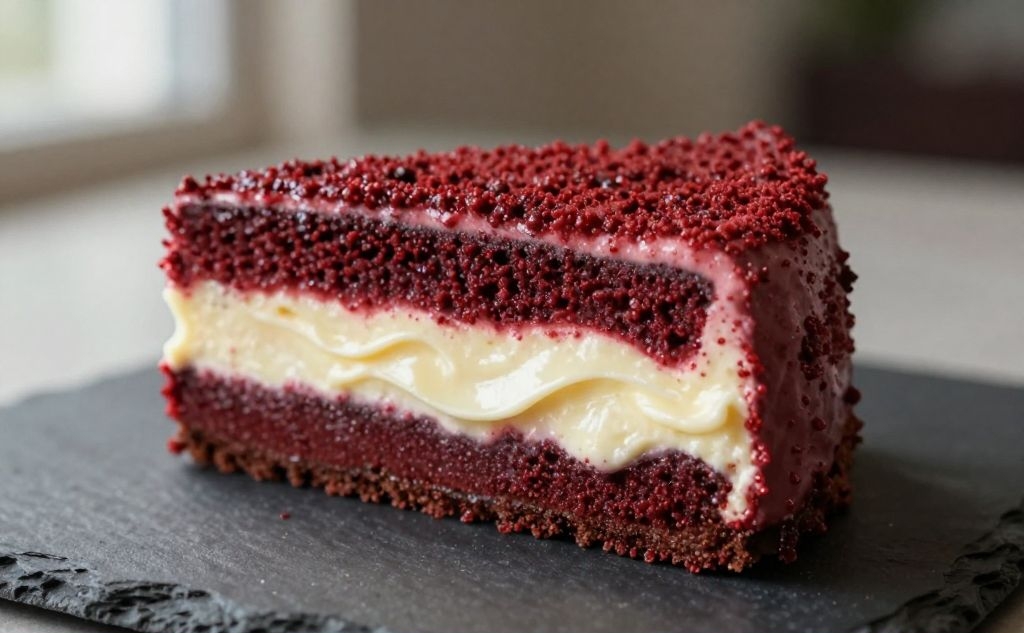

I’ll admit it: I’m a sucker for red velvet anything. But an ice cream cake version with that tangy cream cheese swirl? That’s the kind of dessert that makes you want to skip dinner entirely.
Last summer, I brought this to a backyard barbecue, and my uncle actually tried to hide the remaining slice in his jacket pocket. Don’t worry, I helped him “accidentally” leave it in the freezer for later.
The best part? You don’t need an ice cream maker or any fancy baking skills. Just a little patience while it freezes – and maybe a fork to sneak tastes along the way.
1. Allergens
This cake contains dairy (heavy cream, sweetened condensed milk, cream cheese) and gluten from the cookie crust. If you need a dairy-free version, check out the variations section below – coconut cream and vegan cream cheese work beautifully.
Eggs are not present in this no-churn recipe, so it’s safe for those with egg allergies. However, always double-check your sweetened condensed milk and cookie crumbs for hidden allergens like soy or nuts.
The cream cheese swirl is prominent, so avoid this one if you have a severe dairy allergy. For a nut-free option, most chocolate wafer cookies are safe, but read labels because some brands process nuts in the same facility.
2. Ingredient notes & substitutions
Don’t have buttermilk? Mix 1 tablespoon of white vinegar or lemon juice with regular milk and let it sit for 5 minutes. That fake buttermilk tang is what gives red velvet its signature flavor, so please don’t skip it.
3. Pro tips
Use gel food coloring, not the watery liquid kind from the grocery store. Liquid coloring can thin out your ice cream base and make it freeze icy. I learned this the hard way – my first batch looked like a sad pink slushie.
Whip your heavy cream to stiff peaks but stop before it turns into butter. You want fluffy clouds, not yellow clumps. If you over-whip, just add a few tablespoons of cold cream and fold gently to rescue it.
Let the cream cheese come to full room temperature before making the swirl. Cold cream cheese will leave lumpy, un-mixable blobs that freeze into weird chalky bits. Set it on the counter for an hour, or microwave for 10 seconds if you’re impatient like me.
When swirling, use a butter knife and make just four or five figure-eight motions. Over-swirling turns the beautiful marbled pattern into a muddy brown mess. Less is definitely more here.
4. Storage & make-ahead (fridge/freezer)
This cake lives in the freezer, obviously. Wrap it tightly with plastic wrap and then foil to prevent freezer burn for up to 2 months. Pro tip: slice the cake while it’s still partially frozen (about 15 minutes out of the freezer) for clean cuts.
You can make the entire cake up to a week ahead. Just keep it in the pan with the removable bottom covered, or transfer to an airtight container after it’s fully frozen. Do not store in the fridge – it will turn into a soupy mess.
5. Serving suggestions
Let the cake sit at room temperature for 5–10 minutes before slicing. This softens the ice cream just enough to feel velvety, not rock-hard. Run your knife under hot water and wipe it dry between each cut for perfect slices.
Serve with a drizzle of warm chocolate sauce or extra cream cheese glaze. I like to crumble a few extra chocolate cookies on top because I have no self-control.
Pair it with strong black coffee or a cold glass of milk to balance the sweetness. For a real party trick, add a scoop of this cake next to a slice of plain red velvet cake – double velvet, double trouble.
If you’re feeling fancy, garnish each plate with fresh raspberries or a mint sprig. The tartness cuts through the richness beautifully, and it makes your Instagram followers weep with envy.
6. Use your leftovers
Leftovers? Ha, good one. But if you somehow have some, crumble the cake into a glass and layer with whipped cream for a red velvet ice cream sundae parfait. Call it a “deconstructed cake” and charge twelve bucks.
Melt a leftover slice into a milkshake. Just blend it with a splash of milk and maybe a banana – it’s gloriously pink and tastes like a fancy diner shake.
You can also slice the frozen cake into small cubes and dip them in melted chocolate. Freeze again on a parchment-lined tray, and boom – red velvet ice cream bonbons. Your kids (or you) will lose their minds.
Got a sad corner piece with more crust than swirl? Crumble it over a bowl of plain vanilla ice cream as a crunchy topping. Waste not, want not.
If the cake has been in the freezer too long and developed ice crystals, chop it into chunks and use it as a mix-in for homemade cookie dough. Fold those frozen chunks into chocolate chip cookie batter before baking – trust me.
And the ultimate leftover move? Let the whole thing melt (gasp) into a bowl, stir it up into a thick milkshake-like slurry, and refreeze in popsicle molds. Red velvet cream pops for the win.
7. Common mistakes & how to fix them
Icy, crystallized texture usually means you didn’t whip the cream enough or you used low-fat ingredients. Fat is your friend here – don’t even think about skim milk or low-fat cream cheese. If your cake is already icy, let it soften slightly, then re-blend the whole mixture and refreeze.
The cream cheese swirl disappeared? You probably over-swirled or added it when the ice cream base was too warm. Next time, chill the base for 20 minutes in the fridge before adding dollops. For this batch, just drizzle a fresh cream cheese glaze over each slice when you serve it.
Crumb crust falling apart? You didn’t pack it firmly enough. Use the bottom of a measuring cup to really press those crumbs down. And add a tablespoon more melted butter next time – it’s the glue that holds everything together.
8. Variations by diet or flavor profile
Dairy-free version: Use full-fat coconut cream (chilled, with the solid top layer) instead of heavy cream, and vegan sweetened condensed coconut milk. Swap the cream cheese for a good vegan cream cheese (Kite Hill or Violife work well). The texture will be slightly softer, but still delicious.
9. “Why this recipe works” / The science
Red velvet isn’t just chocolate plus red food coloring. The magic comes from the reaction between buttermilk’s acidity and cocoa powder’s anthocyanins (which turn red in acidic environments). That’s why we add a little vinegar – to boost that chemical tango and create the classic color without using a whole bottle of dye.
No-churn ice cream relies on sweetened condensed milk’s sugar and proteins to lower the freezing point and prevent large ice crystals. When you fold in whipped cream, you trap tiny air bubbles that keep the texture light and scoopable even after hours in the freezer.
The cream cheese swirl stays lush instead of freezing rock-solid because cream cheese has a higher fat content and lower water content than milk. Fat resists freezing, so those swirls remain soft and creamy while the surrounding ice cream is firm. It’s like a little pocket of velvet in every bite.
10. Frequently Asked Questions (FAQ)
Can I use homemade chocolate cookie crumbs? Absolutely. Blitz any chocolate sandwich cookies (filling and all) in a food processor. Just reduce the melted butter to 3 tablespoons because the filling adds extra fat.
Why is my ice cream cake so hard to cut? You didn’t let it warm up. Five minutes at room temperature is non-negotiable. Or dip a serrated knife in hot water and wipe it dry between slices – works like a charm.
11. Call to action
If you make this velvety red velvet ice cream cake (and you really, really should), please come back and leave a comment below. Tell me if your uncle tried to steal a slice – or if you added a secret bourbon swirl because you’re a genius.
Snap a photo and tag me on Instagram – I genuinely get a little thrill every time I see one of my recipes in your kitchen. Use the hashtag #VelvetFreezeParty so I can find it.
Also, hit that subscribe button if you haven’t already. I send out a weekly email with my latest disasters… I mean, creations. No spam, just butter and sugar.
Got a question I didn’t answer? Drop it in the comments and I’ll reply within 24 hours. I’m weirdly fast at responding because I’m always on my phone while waiting for things to freeze.
And finally, share this recipe with that one friend who claims they can’t bake. This cake requires zero oven time, so they have no excuse. Let’s turn them into a dessert legend.
So here’s the deal: this cake looks like you spent hours layering and piping, but it’s really just a glorified freezer dump-and-stir. You get all the nostalgia of red velvet with the cool, creamy satisfaction of ice cream. And that cream cheese swirl? It’s the unsung hero that ties everything together.
Go ahead and make it for your next cookout, birthday, or random Tuesday. Your freezer will thank you. And when someone asks for the recipe, just smile and say, “Oh, it’s nothing.” Then hand them your phone with this page open.
Recipe
Recipe Name: Velvety Red Velvet Ice Cream Cake with a Lush Cream Cheese Swirl
Servings: 8
Estimated Cost Per Serving: $1.50
Prep Time: 30 minutes
Cook Time: 0 minutes
Total Time: 6 hours (includes freezing)
Course: Dessert
Cuisine: American
Calories Per Serving: 450
Diet: Vegetarian
Difficulty: Easy
Ingredients
For the crust:
1 ½ cups chocolate cookie crumbs (about 15 chocolate wafers or Oreos without the filling)
4 tablespoons unsalted butter, melted
For the red velvet ice cream:
1 can (14 oz) sweetened condensed milk
2 cups heavy cream, cold
2 tablespoons unsweetened cocoa powder
1 teaspoon vanilla extract
1 tablespoon buttermilk (or regular milk + 1 tsp white vinegar)
¼ teaspoon salt
1 tablespoon red gel food coloring (or more for desired shade)
For the cream cheese swirl:
4 oz full-fat cream cheese, softened to room temperature
¼ cup powdered sugar
½ teaspoon vanilla extract
1–2 tablespoons whole milk (as needed for thinning)
Instructions
First, make the crust. In a medium bowl, mix the chocolate cookie crumbs with melted butter until it looks like wet sand. Press firmly into the bottom of a 9-inch springform pan or an 8×8 square pan lined with parchment paper. Use the bottom of a measuring cup to really pack it down. Place the pan in the freezer while you prepare the ice cream.
Next, make the cream cheese swirl. In a small bowl, beat the softened cream cheese with powdered sugar and vanilla until smooth. Add milk one tablespoon at a time until you get a drizzle-able but still thick consistency. Set aside at room temperature.
Now for the ice cream. In a large mixing bowl, combine the sweetened condensed milk, cocoa powder, vanilla, buttermilk, salt, and red gel coloring. Whisk until completely smooth and brightly red. The batter will be thick.
In a separate chilled bowl, whip the cold heavy cream with an electric mixer on medium-high speed until stiff peaks form. Do not over-whip – you want fluffy peaks, not butter.
Gently fold one-third of the whipped cream into the red velvet mixture to lighten it, then fold in the remaining whipped cream. Be careful not to deflate too much; a few white streaks are fine.
Assemble the cake. Remove the crust pan from the freezer. Spread half of the red velvet ice cream over the crust. Dollop half of the cream cheese mixture in small spoonfuls across the surface. Use a butter knife to make 3–4 gentle swirls. Top with the remaining red velvet ice cream, then dollop the rest of the cream cheese mixture. Swirl again very lightly – fewer strokes than you think.
Cover the pan tightly with plastic wrap and freeze for at least 6 hours, or overnight. For cleaner slices, freeze for 8 hours.
To serve, remove the cake from the freezer and let it sit at room temperature for 5–10 minutes. Run a knife under hot water, wipe dry, and slice. Serve cold and enjoy every single velvety bite.