
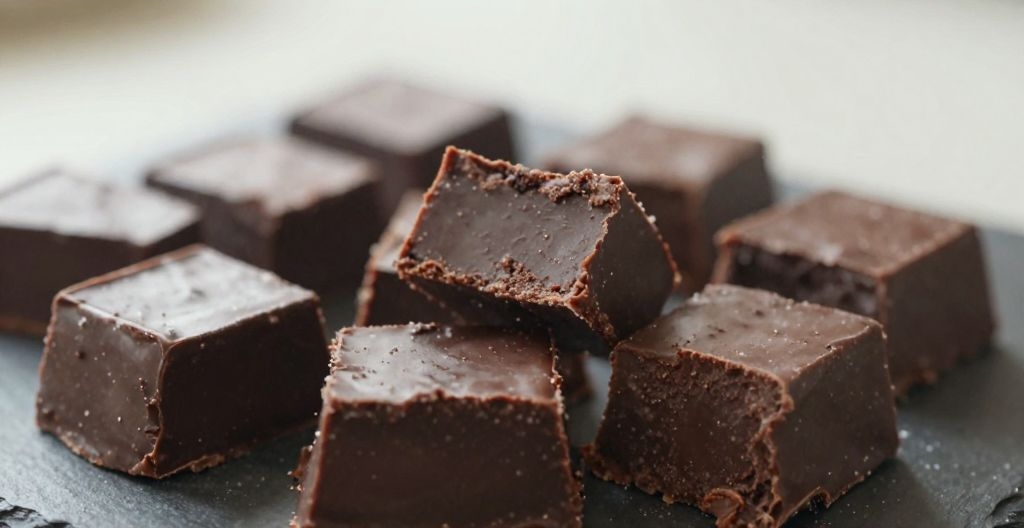

Have you ever bitten into a piece of fudge that felt more like sugary sand than a creamy dream? Me too. After way too many gritty batches, I finally cracked the code for a velvety homemade fudge that actually lives up to the name.
This fudge is silky, slow-melting, and dangerous to keep in the fridge. You’ll find excuses to “just have one more square” until the pan mysteriously empties.
The secret? No shortcuts, no weird ingredients – just proper technique and a little patience. Ready to become the fudge hero of your next cookie swap?
1. Allergens
This fudge contains dairy from butter and sweetened condensed milk. It also includes soy if your chocolate chips contain soy lecithin (most do). Check labels to be sure.
No gluten in the basic recipe – all ingredients are naturally gluten-free. However, cross-contamination can happen with chocolate or extracts, so buy certified if needed.
Nuts are not in the recipe, but you can add them as a variation. If you do, warn your guests about tree nuts or peanuts.
For a dairy-free version, swap vegan butter and coconut condensed milk. The texture changes slightly but still works beautifully.
2. Ingredient notes & substitutions
The star is sweetened condensed milk – don’t confuse it with evaporated milk. That swap will leave you with a soupy mess. Use full-fat for the creamiest result; low-fat tends to thin out.
For chocolate, go with good-quality semi-sweet chips or bars (at least 60% cacao). Milk chocolate makes it too sweet, and white chocolate needs a different method. No chocolate? Try peanut butter chips, but expect a different flavor profile.
3. Pro tips
Use a heavy-bottomed saucepan to prevent scorching. Cheap thin pans create hot spots that burn sugar before it melts evenly.
Stir constantly with a silicone spatula – don’t walk away! Fudge goes from perfect to grainy in seconds if you get distracted by your phone.
Let the mixture bubble for exactly 2 minutes after it comes to a full boil. Set a timer. Too little time and it won’t set; too much and it turns crumbly.
Pour the fudge into a lined pan without scraping the pot’s sides. That crusty stuff on the edges can seed crystals and ruin your texture.
Let it cool undisturbed at room temperature for 10 minutes, then refrigerate. Resist the urge to poke it – patience pays off in that slow-melting bite.
4. Storage & make-ahead (fridge/freezer)
Once the fudge is fully set (about 2 hours in the fridge), cut it into squares. Store in an airtight container with parchment between layers to prevent sticking.
In the fridge, this fudge stays perfect for up to 2 weeks. Honestly, it never lasts that long in my house, but theoretically it could.
For longer storage, freeze it for up to 3 months. Wrap each square individually in plastic wrap, then place in a freezer bag.
To thaw, just move the squares to the fridge overnight. You can also eat them semi-frozen for a different texture – like chocolate candy bark.
Make-ahead tip: Prepare the fudge up to a month before a holiday. Label the container with the date, because frozen fudge all looks the same.
Avoid storing near onions or strong-smelling foods. Fudge absorbs odors like a sponge, and garlic fudge is not the flex you think it is.
5. Serving suggestions (complete the meal)
This fudge shines as a dessert on its own, but pair it with strong coffee or espresso to cut the sweetness. A glass of cold milk also works – basic but classic.
For a fancy dessert board, crumble the fudge over vanilla ice cream or use it as a dip for strawberries. Yes, dip fruit into fudge – life-changing.
Serve it after a hearty meal like chili or roast chicken. The rich, slow-melting bite provides a satisfying contrast to savory main courses.
6. Use your leftovers
Crush leftover fudge into hot fudge sauce by melting it with a splash of cream, or fold chunks into brownie batter for double-chocolate chaos.
7. Common mistakes & how to fix them
Grainy fudge means sugar crystals formed. Next time, wipe down the sides of the pan with a wet pastry brush during boiling. For this batch, try reheating with a tablespoon of cream and stirring gently – sometimes it rescues.
Fudge didn’t set – it’s too soft. You probably undercooked it. Return it to the pan, add a bit more condensed milk, and bring back to a boil for 1 minute.
Oily or separated fudge happens when the chocolate gets too hot. Don’t panic. Let it cool slightly, then whisk in a teaspoon of room-temperature butter to emulsify.
White swirls or bloom are just cocoa butter rising to the surface. It’s ugly but harmless. Melt the fudge gently and re-pour for a uniform look.
8. Variations by diet or flavor profile
Vegan option: Use coconut condensed milk and vegan butter. Dark chocolate with no dairy (check for 70% plus) works beautifully. Add a pinch of sea salt to balance the coconut note.
Flavor twists: Stir in 1/2 cup of crushed peppermint candies, orange zest, or toasted walnuts after removing from heat. For a salted caramel vibe, sprinkle flaky sea salt on top before chilling.
9. Why this recipe works (the science)
Sweetened condensed milk is the secret weapon – it’s already reduced with sugar, so you don’t risk crystallization. The low moisture content creates that dense, slow-melting structure.
Heating to a gentle boil allows the sugar to dissolve completely while the milk proteins bind with fat from the butter. This gives you a stable emulsion without needing a candy thermometer.
Stirring constantly prevents localized overheating that would break the emulsion. Think of it as holding hands between sugar and fat – don’t let go.
The two-minute boil is short enough to avoid caramelization but long enough to evaporate just enough water. That specific timing yields a fudge that’s firm yet silky.
As it cools, the sugar molecules arrange into a smooth network instead of jagged crystals. That’s the difference between a velvety bite and a sad, sandy mess.
10. Frequently Asked Questions (FAQ)
Can I use evaporated milk instead? No – that will give you a caramel sauce, not fudge. Evaporated milk lacks the sugar and thickness of condensed milk.
Why is my fudge sticky on top? You probably covered it before it was fully cooled. Condensation drips back onto the surface. Next time, let it cool uncovered for an hour.
How do I get clean, sharp cuts? Use a long knife warmed under hot water, then wipe dry between cuts. Dip the blade in hot water again for each slice.
Can I double this recipe? Yes, but use a larger pan (9×13 instead of 8×8) and increase boil time to 3 minutes. Stir even more vigilantly.
Is this fudge safe for gifting? Absolutely. It holds up well at room temperature for a day or two, but pack it in a tin with wax paper if mailing.
What’s the best chocolate brand? I love Ghirardelli or Guittard. Avoid store-brand chips with stabilizers – they resist melting smoothly.
11. Call to action (comment, share, subscribe)
If you make this velvety fudge, drop a comment below and tell me how it melted on your tongue. Did you add any wild mix-ins? I need to know.
Share this recipe with your fellow chocolate-obsessed friends – especially the ones who’ve suffered through grainy fudge disasters. Tag me on social so I can cheer you on.
Don’t forget to subscribe to the blog for more dessert wins (and occasional fails, because I’m honest like that). Next week: triple-layer brownies that might ruin your diet.
That’s the fudge that finally made me stop buying expensive gift boxes. You get all the creamy, slow-melting satisfaction for a fraction of the cost.
Give it a whirl this weekend, preferably when you have no plans to leave the house. Because once you start eating this stuff, leaving the pan unattended becomes a character flaw.
Now go forth and fudge. Your kitchen is about to smell like a chocolate factory.
Recipe Name: Velvety Homemade Fudge
Servings: 16 (1-inch squares)
Estimated Cost Per Serving: $0.45
Prep Time: 10 minutes
Cook Time: 5 minutes
Total Time: 2 hours 15 minutes (includes chilling)
Course: Dessert
Cuisine: American
Calories Per Serving: 160
Diet: None (vegetarian, gluten-free if using certified ingredients)
Difficulty: Easy
Ingredients:
14 oz (396g) sweetened condensed milk (one can)
2 cups (340g) semi-sweet chocolate chips (or chopped chocolate)
4 tbsp (56g) unsalted butter, cut into cubes
1 tsp vanilla extract
1/4 tsp fine sea salt
Instructions:
First, line an 8×8 inch baking pan with parchment paper, leaving overhang on two sides.
Second, in a heavy-bottomed saucepan over medium-low heat, combine the sweetened condensed milk, chocolate chips, butter, and salt.
Third, stir constantly with a silicone spatula until the chocolate and butter are fully melted and the mixture is smooth.
Fourth, increase heat to medium and bring the mixture to a gentle boil. Let it boil for exactly 2 minutes, stirring non-stop.
Fifth, remove from heat and stir in the vanilla extract.
Sixth, pour the fudge into the prepared pan. Do not scrape the sides of the pot. Spread evenly with the spatula.
Seventh, let the fudge cool at room temperature for 10 minutes, then refrigerate for at least 2 hours until firm.
Eighth, lift the fudge out using the parchment overhang. Cut into 16 squares with a warm knife. Serve or store as directed.