
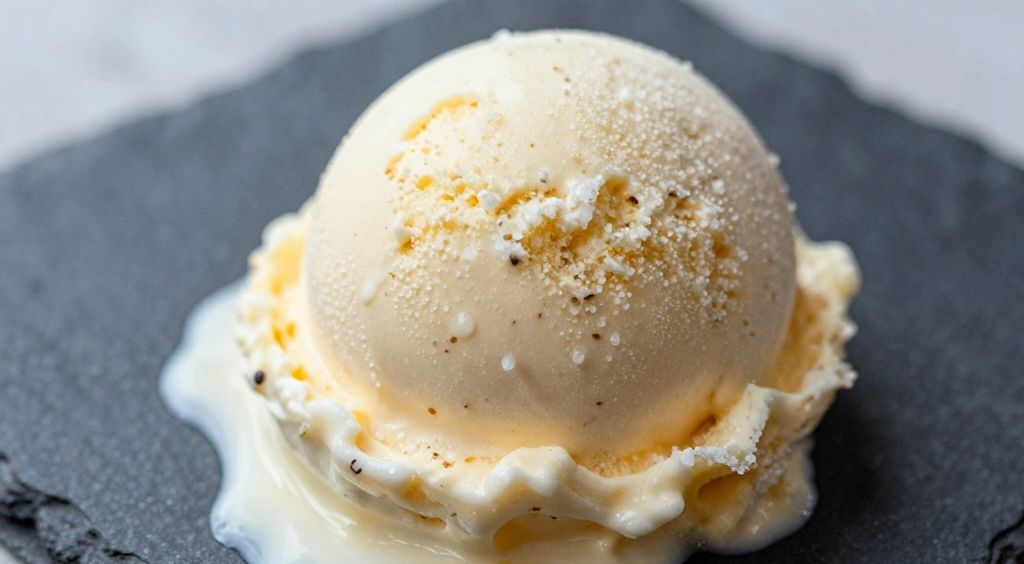

You know that store-bought vanilla ice cream that tastes like frozen whipped cream with a hint of sadness? Yeah, we’re not doing that today. This homemade version is legit creamy, silky, and rich – the kind that makes you close your eyes on the first bite.
I spent years chasing that perfect scoop, and spoiler: the secret is patience and a few egg yolks. But don’t worry, I’ll walk you through every step like we’re in my kitchen together, probably spilling something.
Ready to impress yourself? Let’s get churning.
1. Allergens
This recipe contains dairy (heavy cream and whole milk) and eggs. If you or a loved one has a severe allergy to these, please stop here and check the variations section below for swaps. I also use pure vanilla extract, which is typically alcohol-based and gluten-free, but some cheap extracts sneak in corn syrup or other additives – read your labels.
Cross-contamination is a real thing. If you’re making this for someone with celiac disease or a severe egg allergy, scrub your bowls and utensils like you’re preparing for a surprise health inspection. For nut allergies, my recipe is naturally nut-free, but always verify your vanilla extract and any add-ins (like cookie chunks) are processed in a nut-free facility.
2. Ingredient notes & substitutions
Heavy cream gives that luxurious mouthfeel – don’t swap it for half-and-half or you’ll get icy sadness. Whole milk works best, but you can use 2% in a pinch (the texture will be slightly less rich). Real vanilla bean paste or a fresh vanilla bean pod beats cheap imitation extract every time, but a good quality pure vanilla extract is totally fine. Sugar is non-negotiable here; coconut sugar changes the flavor, so just use regular granulated.
3. Pro tips
Chill your ice cream maker bowl for at least 24 hours. I’m serious. If it’s not completely frozen, you’ll end up with a slushy mess. Put it in the coldest part of your freezer – back corner, not the door.
Don’t rush the custard. When you’re heating the milk, cream, and egg yolks, keep the heat at medium-low. If you crank it, you’ll scramble the eggs and get vanilla-flavored scrambled eggs soup. Not a good look.
Strain the base through a fine-mesh sieve before chilling. This catches any accidental cooked egg bits or vanilla bean fibers. It takes ten seconds and guarantees silky smooth ice cream.
Let the base rest in the fridge for at least 4 hours, ideally overnight. This “aging” step lets the fat and proteins relax, giving you a denser, creamier final product. Yes, waiting is the hardest part. No, you cannot skip it.
4. Storage & make-ahead
You can make the custard base up to 3 days ahead – just keep it covered in the fridge. The day you want ice cream, churn it fresh. Once churned, transfer to an airtight container and press a piece of parchment paper directly on the surface to prevent ice crystals. Store in the back of your freezer (not the door) for up to 2 months, though good luck not finishing it in a week.
For make-ahead magic, freeze the container you’ll use for storage beforehand – a cold container means less melting when you scoop the churned ice cream in. Smart, right?
5. Serving suggestions
Warm brownies + this vanilla ice cream = a legal reason to skip dinner. Pile a scoop on a gooey chocolate brownie or a crispy-edged blondie. For a classic move, pair it with apple pie or peach cobbler – the hot-cold contrast is chef’s kiss.
Want to get fancy? Drizzle salted caramel sauce or hot fudge over a big scoop in a chilled bowl. Sprinkle crushed freeze-dried raspberries or toasted pecans on top for texture. Or go full kid mode: pour root beer over it for a homemade float. (Yes, straw required.)
For a brunch twist, plop a scoop on your French toast or waffles instead of whipped cream. Don’t knock it ’til you’ve tried it.
6. Use your leftovers
Leftover vanilla ice cream? Who are you, a saint? But if the ice cream gets too hard or icy after a few weeks, let it soften for 10 minutes at room temperature, then re-churn it in your machine for 5 minutes – it revives the texture like magic.
Use melty leftovers as a lazy “crème anglaise” – drizzle over berries or pound cake. You can also blend leftover ice cream with a splash of milk to make a milkshake (add chocolate syrup or a banana for bonus points). Or mix softened ice cream with crushed cookies, roll into a log, and re-freeze for an ice cream cake roll.
Another trick: scoop leftover ice cream into silicone muffin cups, freeze solid, then pop out for perfect portion-controlled mini scoops. Great for when you “only want a little” (who are we kidding).
7. Common mistakes & how to fix them
Ice crystals forming? That means your base wasn’t chilled enough before churning, or you didn’t press plastic wrap onto the surface during storage. Next time, chill the base overnight and cover tightly. For now, scrape off the crystals and serve the rest – it’s still tasty, just less pretty.
Custard turned into sweet scrambled eggs? You overheated it. Don’t panic – strain it through a sieve immediately. The liquid part might still be salvageable for a thinner ice cream, but honestly, start over with fresh eggs and lower heat. We’ve all been there. Pour yourself a glass of wine and try again.
Ice cream is too hard to scoop after freezing. Let it sit on the counter for 5-10 minutes or microwave the scoop under hot water before digging in. Next time, add a tablespoon of vodka or corn syrup to the base – alcohol and invert sugars prevent rock-hard freezing.
8. Variations by diet or flavor profile
Dairy-free? Swap the heavy cream for full-fat canned coconut cream and the milk for unsweetened oat or cashew milk. Use 4 egg yolks as written – they still work. The texture will be slightly coconutty but still rich. Vegan? Replace eggs with 1/4 cup refined coconut oil + 2 tbsp cornstarch (look up a dedicated vegan custard method), and use all plant milks. For flavor variations, stir in 1/2 cup crushed Oreos, a swirl of raspberry jam, or 2 tbsp espresso powder before churning.
9. Why this recipe works
Egg yolks are the secret weapon. They contain lecithin, a natural emulsifier that binds fat and water together so the ice cream stays creamy instead of icy. Heating the yolks with milk and cream creates a custard that traps tiny air bubbles during churning – that’s the “silky” texture.
Heavy cream has a high butterfat content (at least 36%), which coats your tongue and delivers that rich, luxurious feel. Whole milk adds water for a scoopable consistency without being greasy. The balance of fat to water to sugar is exactly right here – too much fat and it’s buttery, too little and it’s an ice cube.
Resting the base overnight gives the proteins and fats time to fully hydrate and stabilize. This means smaller ice crystals when you churn, which means smoother ice cream. Science for the win :).
10. Frequently Asked Questions (FAQ)
Do I need an ice cream maker? Yes, for this texture. You can try the “freeze and stir every 30 minutes” method, but you’ll get icier results. I use a $40 Cuisinart – cheap and works great. Can I reduce the sugar? You can cut it by 2 tablespoons, but any less and the ice cream will freeze rock hard. Sugar acts as an antifreeze. Why is my ice cream yellow? That’s the egg yolks and vanilla; it’s normal and delicious.
How do I know when the custard is thick enough? Dip a spoon in – it should coat the back and leave a clear line when you run your finger through it. Or use a thermometer: 170°F to 175°F. Don’t let it boil. Can I double this recipe? Absolutely, but churn in two batches unless your machine has a large capacity (most home machines max at 1.5 quarts).
11. Call to action (comment, share, subscribe)
If you make this vanilla ice cream, drop a comment below and tell me how it turned out – did you add any mix-ins? Burn the custard? I wanna hear the wins and the oops moments. Seriously, your kitchen fails make me feel less alone.
Share this recipe with a friend who needs a win this week. Pin the photo on Pinterest or tag me in your Instagram story – I repost every scoop I see. And if you haven’t subscribed to my email list, you’re missing my weekly “kitchen therapy” letters and a free printable pantry checklist.
Now go forth and churn. Your freezer is waiting for its glow-up.
That’s the magic of homemade – you control every ingredient, and the reward is a scoop that tastes like pure joy. No weird stabilizers, no air-pumped fluff, just honest-to-goodness vanilla bliss. Make it once, and you’ll never look at a supermarket carton the same way again. Now get in that kitchen and make some memories (and maybe a mess – that’s half the fun).
Recipe Name: Creamy, Silky, and Rich Homemade Vanilla Ice Cream
Servings: 6 (about 1.5 quarts)
Estimated Cost Per Serving: $1.25
Prep Time: 20 minutes
Cook Time: 10 minutes (plus chilling and churning time)
Total Time: 4 hours 30 minutes (includes chilling)
Course: Dessert
Cuisine: American
Calories Per Serving: 420
Diet: Vegetarian, Gluten-Free (if using certified gluten-free vanilla)
Difficulty: Medium
Ingredients:
- 2 cups (480 ml) heavy cream
- 1 cup (240 ml) whole milk
- 3/4 cup (150 g) granulated sugar
- 4 large egg yolks
- 1 tablespoon pure vanilla extract (or 1 vanilla bean, seeds scraped)
- 1/8 teaspoon fine sea salt
Instructions:
First, chill your ice cream maker bowl in the freezer for at least 24 hours.
In a medium saucepan, combine the heavy cream, whole milk, and half of the sugar (6 tablespoons). Warm over medium heat, stirring occasionally, until steaming and small bubbles form around the edge – do not boil.
While the cream mixture heats, whisk the egg yolks, remaining sugar, and salt in a separate bowl until pale yellow and slightly thickened (about 2 minutes).
Temper the eggs: slowly pour about 1 cup of the hot cream mixture into the yolk mixture, whisking constantly. Then pour the tempered yolk mixture back into the saucepan.
Cook the custard over medium-low heat, stirring constantly with a wooden spoon or silicone spatula, until it thickens enough to coat the back of a spoon (about 5–7 minutes). It should reach 170°F to 175°F. Do not let it boil.
Remove from heat immediately. Stir in the vanilla extract (or vanilla bean seeds).
Pour the custard through a fine-mesh sieve into a clean bowl to catch any cooked egg bits. Let it cool at room temperature for 20 minutes, then cover and refrigerate for at least 4 hours, ideally overnight. The colder the base, the creamier the ice cream.
Once fully chilled, churn the custard in your ice cream maker according to the manufacturer’s instructions – usually 20–25 minutes. The ice cream will look like soft serve.
Transfer the churned ice cream to a freezer-safe container. Press a piece of parchment paper directly onto the surface, then seal with a lid. Freeze for at least 4 hours to firm up.
Before serving, let the ice cream sit at room temperature for 5–10 minutes to soften slightly for scooping. Enjoy.