

You know that feeling when you spend eight bucks on a tiny square of dry, crumbly fudge from a fancy bakery and instantly regret your life choices? Yeah, me too.
This homemade rocky road fudge is the revenge your wallet has been waiting for. It’s creamy, packed with toasted nuts and pillowy marshmallows, and frankly, it’s embarrassed every bakery version I’ve ever tried.
No candy thermometer, no complicated steps, and no second mortgage required. Just one bowl and a fridge.
1. Allergens
This recipe contains dairy (butter, sweetened condensed milk, chocolate), nuts (walnuts or almonds), and may contain soy depending on your chocolate chips. It is not dairy-free or nut-free as written.
2. Ingredient notes & substitutions
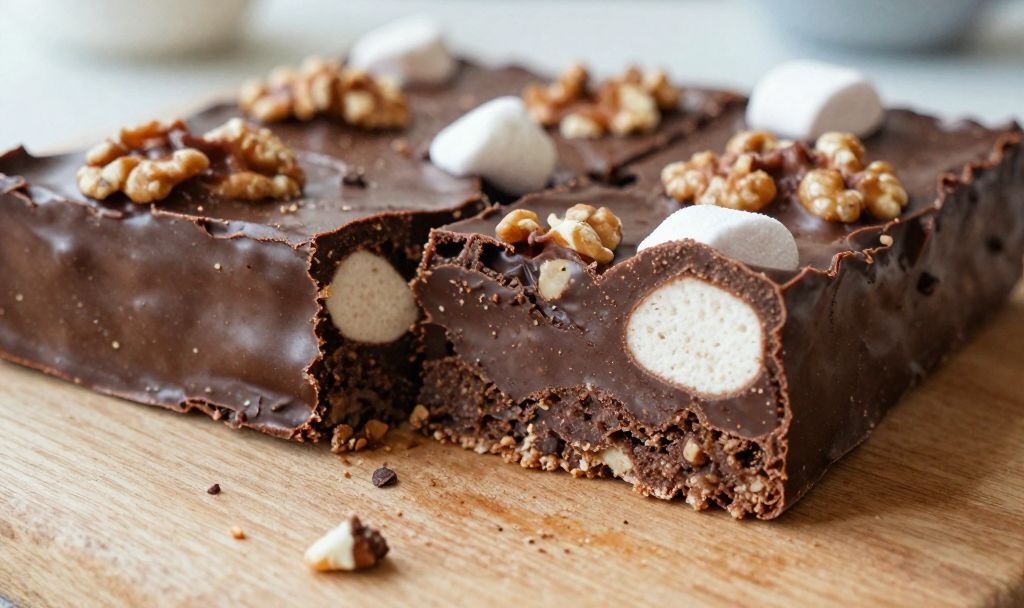
Let’s talk chocolate first. Use a high-quality semi-sweet chocolate chip or chopped bar – cheap brands have waxy stabilizers that ruin the melt. Ghirardelli or Guittard are my go-tos.
Sweetened condensed milk is non-negotiable. Do not grab evaporated milk by accident unless you enjoy a grainy mess. Light corn syrup keeps the fudge glossy but you can swap in honey for a slightly different flavor and softer set.
For nuts, toasted walnuts add a bitter edge that balances the sweet, but pecans or almonds work great. Leave them out entirely for a nut-free version, but then it’s just chocolate marshmallow fudge – still delicious, just less rocky.
3. Pro tips
Line your pan with parchment paper leaving overhang on two sides – this is your fudge elevator. Without it, you’ll be chiseling like a tiny, frustrated miner.
Melt everything low and slow. High heat seizes chocolate into a dull, grainy disaster that no marshmallow can rescue.
4. Storage & make-ahead (fridge/freezer)
This fudge stays fresh in an airtight container at room temperature for about three days. But honestly, room temp here is like 68°F – anything warmer and the marshmallows get weepy.
The fridge is your best friend for up to two weeks. Just bring slices to room temp for ten minutes before eating so the chocolate relaxes.
For make-ahead magic, freeze the whole slab wrapped tightly in plastic then foil for three months. Slice it frozen? You’ll risk cracking. Thaw overnight in the fridge then cut cleanly with a warm knife.
5. Serving suggestions (complete the meal)
Serve these squares on a little plate next to a super dark roast coffee – the bitterness cuts through all that sweet richness like a tiny hero. Or go full nostalgia and crumble a piece over vanilla bean ice cream with a drizzle of salted caramel.
Need a dessert board? Arrange fudge chunks alongside fresh raspberries, shortbread cookies, and a few salty pretzels. The sweet-salty-fruity combo makes people moan.
For a holiday gift, stack four pieces in a clear bag, tie with a red ribbon, and label them “Better Than That Bakery.” Your neighbors will suddenly be very friendly.
6. “Use your leftovers” (reduce waste)
Leftover fudge? I’m sorry, I don’t understand the question. But fine, if you somehow have scraps, chop them into hot fudge sundae topping – the marshmallows get gooey and glorious when warmed.
Crumbled stale fudge (if it ever goes stale) makes a killer garnish for chocolate pudding or brownie batter milkshakes. No waste, just reinvention.
You can also melt down the last two sad pieces with a splash of heavy cream for a quick frosting on graham crackers. Midnight snack emergency solved.
7. Common mistakes & how to fix them
Overheating the chocolate mixture. If it looks oily and separated, you’ve gone too far – no fix except to start over, so watch that heat like a hawk.
8. Variations by diet or flavor profile
Want a vegan version? Use dairy-free sweetened condensed coconut milk, vegan butter, and oat-based chocolate chips. The texture is slightly softer but still dreamy.
For a boozy adult twist, stir in two tablespoons of bourbon or raspberry liqueur right after you pull the mixture off the heat. Do not add more or the fudge won’t set.
Peppermint rocky road for the holidays: swap half the chocolate for white chocolate, add ½ tsp peppermint extract, and crush candy canes on top. Salted caramel version? Drizzle warm caramel sauce over the poured fudge and swirl with a knife before chilling.
9. “Why this recipe works” / The science
Sweetened condensed milk is the secret weapon – its high sugar and fat content prevents sugar crystallization which means no gritty texture. The corn syrup adds invert sugar, interfering with crystal formation even more.
Marshmallows and nuts act as physical interruptions in the chocolate matrix, stopping cracks from spreading. That’s why you can cut clean squares instead of shattering shards.
Chilling sets the cocoa butter into a stable beta crystal form (nerdy, I know) giving that satisfying snap followed by a creamy melt. Bakeries often rush this step; we don’t.
10. Frequently Asked Questions (FAQ)
Can I use mini marshmallows instead of regular? Yes, but measure by weight – mini marshmallows pack tighter. Use 2 cups of minis for every 2.5 cups of regular.
Why is my fudge too soft? Two culprits: you under-cooked the condensed milk mixture (it needs to bubble gently for 2-3 minutes) or you measured loosely packed nuts and marshmallows. Pack your add-ins firmly so there’s less empty space for the chocolate to stretch.
How do I cut fudge cleanly? Warm a chef’s knife under hot water, wipe it dry, then slice straight down. Reheat and wipe between each cut. No sawing.
Can I double this recipe? Absolutely, but use a 9×13-inch pan instead of 8×8. Increase chilling time to at least 4 hours.
Does it need to be refrigerated? Not for the first three days if your house is cool, but after that or in summer heat – yes. Nobody wants melty marshmallow goo on their fingers.
11. Call to action (comment, share, subscribe)
Alright, now it’s your turn. Drop a comment below – did you add crushed graham crackers? Try it with dark chocolate? I need the messy details.
Snap a photo of your glossy, nut-studded fudge and tag me on Instagram. And if you haven’t already, hit that subscribe button so I can slide into your inbox with more bakery-beating recipes.
Now go make your fridge very, very happy.
Conclusion
This rocky road fudge is stupidly easy and dangerously good. Every time I bring it somewhere, people ask for the bakery name – and I get to smirk and say “my kitchen.”
You’ve got no excuses left. Whip up a batch tonight, hide half for yourself, and watch the other half disappear in ten minutes. Then come back and tell me how it outshone every store‑bought version you’ve ever had.
Recipe Name: Outshines the Bakery’s Rocky Road Fudge
Servings: 16 (one 8×8 pan, cut into 2-inch squares)
Estimated Cost Per Serving: $0.85
Prep Time: 10 minutes
Cook Time: 5 minutes
Total Time: 2 hours 15 minutes (includes chilling)
Course: Dessert
Cuisine: American
Calories Per Serving: 290
Diet: None (contains dairy, nuts)
Difficulty: Easy
Ingredients
- 12 oz (340 g) semi-sweet chocolate chips (high quality)
- 14 oz (1 can) sweetened condensed milk
- 2 tbsp (28 g) unsalted butter
- 1 tbsp light corn syrup (or honey)
- 1 tsp vanilla extract
- 1/4 tsp fine sea salt
- 2 cups (about 100 g) mini marshmallows
- 1 cup (120 g) toasted walnuts or almonds, roughly chopped
Instructions
First, line an 8×8-inch square baking pan with parchment paper, leaving overhang on two opposite sides. Set aside.
In a medium saucepan over low heat, combine the chocolate chips, sweetened condensed milk, butter, corn syrup, and salt. Stir constantly with a rubber spatula until the chocolate is completely melted and the mixture is smooth – about 4 to 5 minutes. Do not boil or rush with high heat.
Remove the pan from the heat and stir in the vanilla extract. Let the mixture cool for 60 seconds – this prevents the marshmallows from instantly dissolving.
Add the mini marshmallows and chopped toasted nuts. Fold gently until just combined. The marshmallows should stay mostly whole and fluffy.
Pour the fudge into the prepared pan. Spread evenly with the spatula. Press down lightly to eliminate air pockets but don’t crush the marshmallows.
Refrigerate uncovered for at least 2 hours, or until completely firm. Overnight is even better.
Lift the fudge out using the parchment handles. Place on a cutting board. Warm a sharp knife under hot water, wipe dry, and cut into 16 squares. Wipe the knife clean between each cut for neat edges.
Serve chilled or at room temperature. Store leftovers in an airtight container in the fridge for up to 2 weeks.