
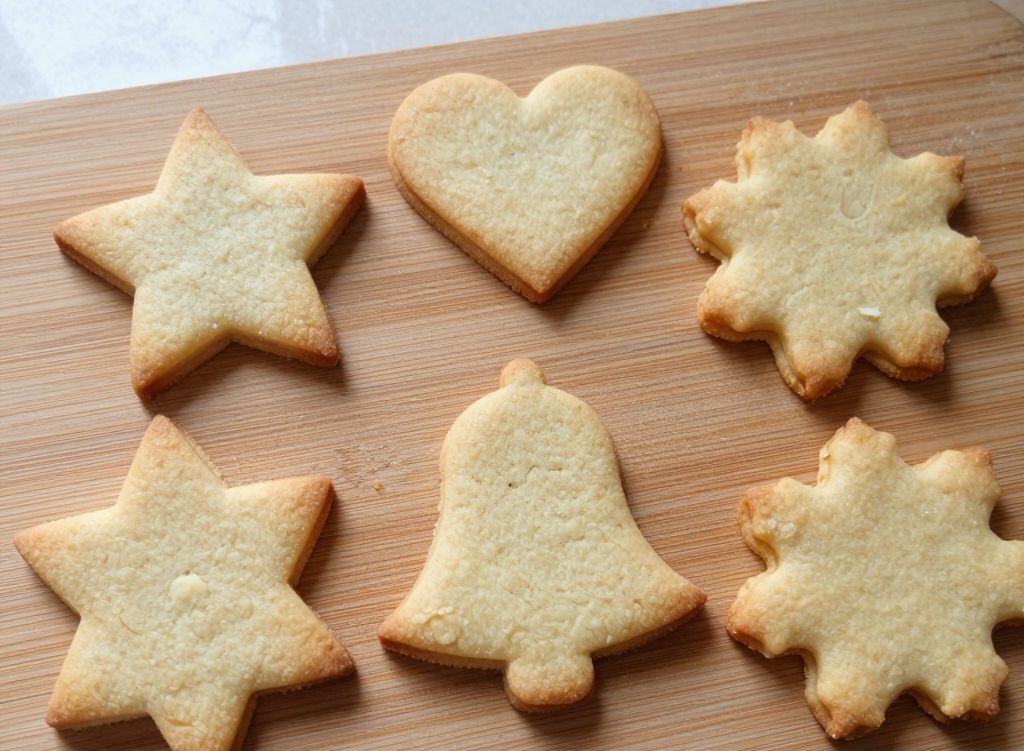

You know that sinking feeling when your carefully cut Christmas trees or hearts turn into puffy, unrecognizable blobs? Yeah, me too. After years of holiday baking frustration, I finally cracked the code for cut out sugar cookies that actually hold their shape.
No more spreading, no more crying over melted Santas. Just sharp edges, clean details, and that perfect buttery flavor. Ready to become a cookie artist? Let’s do this.
1. Allergens
This recipe contains wheat (gluten), dairy (butter), and eggs. If you have celiac disease or a severe wheat allergy, these cookies are not safe for you.
For dairy-free, you can substitute vegan butter (like Miyoko’s or Country Crock Plant Butter) – just make sure it’s the stick kind, not the spreadable tub. Egg allergies are trickier here because eggs provide structure; a flax egg (1 tbsp flaxseed meal + 3 tbsp water) might work but expect slightly more spread.
Soy can appear in some commercial powdered sugars or margarines, so check labels if that’s a concern. This recipe uses no nuts, but always verify your ingredients for cross-contamination.
2. Ingredient notes & substitutions
Unsalted butter is non-negotiable for flavor and spread control. Salted butter has varying water content and can make dough too soft. If you only have salted, reduce the added salt to ¼ tsp.
Powdered sugar (not granulated) is the secret to zero spread. It contains cornstarch, which absorbs moisture and keeps cookies from collapsing. No substitutions here – granulated sugar will ruin your shape.
3. Pro tips
Chill your dough twice. First, chill the whole dough ball for at least 2 hours. Then after you cut out shapes, chill the cut cookies on the baking sheet for 15 minutes in the fridge or 10 in the freezer. This solidifies the butter so it melts slowly instead of instantly flooding the cookie.
Use a silicone baking mat or parchment paper – never greased foil or bare pans. Grease encourages spreading. Your cookies need a little friction to stay put.
Roll dough between two sheets of parchment to ¼-inch thickness. Any thinner and they’ll crisp too fast; any thicker and the center won’t bake evenly. A rolling pin with thickness rings is a game-changer, but you can eyeball it with two wooden dowels or even chopsticks.
Freeze stubborn shapes. For intricate cutters (snowflakes, letters), pop the whole sheet in the freezer for 20 minutes. Then bake straight from freezer – no need to thaw. The colder the dough, the cleaner the edges.
Don’t overwork the scraps. Gather them gently, press into a disc, and chill again for 15 minutes before re-rolling. Overhandling melts the butter and adds gluten, both of which cause spread.
4. Storage & make-ahead (fridge/freezer)
Fridge: Raw dough keeps in an airtight container for up to 3 days. Wrap it tightly in plastic wrap first, then put it in a zip bag. When you’re ready, let it sit on the counter for 10 minutes before rolling – just enough to take the chill off without getting soft.
Freezer (dough balls): Shape the dough into a disc, wrap in plastic, then foil. It stays good for 3 months. Thaw overnight in the fridge, then proceed as usual.
Freezer (cut, unbaked cookies): Arrange cut shapes on a parchment-lined baking sheet, freeze until solid (about 2 hours), then stack them between parchment layers in a freezer bag. They’ll last 3 months. Bake from frozen, adding 2-3 minutes to the bake time.
Baked cookies: Keep unfrosted cookies in a sealed container at room temperature for up to 2 weeks. Frosted cookies? Refrigerate them for up to 5 days, but let them come to room temp before serving so the frosting softens.
5. Serving suggestions (complete the meal)
These cookies are dessert all on their own, but they shine as part of a cookie platter alongside gingerbread men and chocolate crinkles. For a cozy afternoon, serve them with a mug of hot cocoa or spiced apple cider.
Royal icing is the classic pairing – pipe it on for stained-glass effects or keep it simple with a dusting of powdered sugar. If you’re feeling cheeky, sandwich two cookies with lemon curd or Nutella. Just don’t blame me when you eat six of them before dinner.
6. Use your leftovers
Stale cookies? Crumble them into a cookie crust for cheesecake or pies. Pulse in a food processor with 2 tbsp melted butter, press into a pan, and bake at 350°F for 8 minutes.
Leftover royal icing? Drizzle it over brownies or use it as edible glue for gingerbread houses. You can also thin it with a few drops of water and dip pretzel rods for an easy snack.
7. Common mistakes & how to fix them
“My cookies spread anyway!” You either skipped the second chill, used granulated sugar, or your butter was too warm. Always start with cold butter straight from the fridge. If your kitchen is hot (above 75°F), chill the dough for an extra hour.
“The edges are burnt but centers are pale.” Your oven runs hot. Get an oven thermometer – most home ovens lie by 25°F or more. Also, bake on the middle rack, not the bottom. Dark baking sheets absorb more heat; switch to light-colored aluminum.
“The dough cracks when I roll it.” It’s too cold. Let it sit at room temperature for 5-10 minutes. If it still cracks, knead it gently with your hands for 30 seconds to warm it slightly.
“My cutters stick to the dough.” Dip the cutter in flour before each press. For sticky dough, freeze the cutouts for 5 minutes before moving them with a thin spatula.
8. Variations by diet or flavor profile
Gluten-free: Swap the all-purpose flour for a cup-for-cup gluten-free blend that contains xanthan gum (like King Arthur Measure for Measure). Add an extra tablespoon of milk if the dough feels dry. Chill for 3 hours instead of 2.
Lemon sugar cookies: Add the zest of one lemon and 1 teaspoon of lemon extract to the dough. Replace the vanilla with lemon extract for a brighter pop.
Chocolate cut-outs: Replace ¼ cup of the flour with ¼ cup unsweetened cocoa powder. Reduce the baking powder to 1 teaspoon (cocoa is acidic). These spread even less because cocoa absorbs moisture.
Vegan (dairy-free, egg-free): Use vegan butter sticks and replace the egg with 2 tablespoons of aquafaba (chickpea brine) plus ½ teaspoon cream of tartar. Whip until frothy before adding. The texture is slightly more delicate, so handle carefully.
9. “Why this recipe works” / The science
Powdered sugar is your hero. Unlike granulated sugar, powdered sugar contains cornstarch (about 3%). Cornstarch absorbs excess moisture from butter and eggs, creating a dough that melts slowly in the oven. Slow melt = no spread.
Chilling does two things. First, it solidifies the butter so it doesn’t liquefy instantly. Second, it relaxes the gluten you developed during rolling. Relaxed gluten = less spring-back and warping.
No baking soda, only baking powder. Baking soda spreads cookies like crazy because it creates large gas bubbles that push outward. Baking powder is double-acting – it gives a gentle lift without horizontal expansion. Plus, this recipe uses just 1½ teaspoons, enough lift for a tender crumb but not enough to puff into blobs.
Egg yolk only? Actually this recipe uses one whole egg. The white provides structure and moisture balance. Too many egg whites make cookies tough; too many yolks make them greasy. One large egg is the sweet spot.
10. Frequently Asked Questions (FAQ)
Can I use granulated sugar? I’ll say it loud for the people in back: no. Granulated sugar melts into syrup in the oven, which flows outward like lava. You will get pancake-shaped disasters. Powdered sugar or bust.
Why do my cookies taste “floury”? You either over-floured your rolling surface or didn’t bake them long enough. Roll on parchment instead of a floured counter. Bake until the edges are very lightly golden, not pale. Pale edges = raw flour taste.
Do I need to decorate these? Absolutely not. They’re delicious plain – buttery, crisp around the edges, and tender in the middle. My kids eat them naked (the cookies, not the kids).
Can I double the recipe? Yes, but divide the dough into two discs. A massive ball of dough won’t chill evenly. Work in batches, and keep half in the fridge while you roll the first half.
My dough is too sticky to roll. Add flour one tablespoon at a time, up to 3 tablespoons. Sticky dough means your butter was too soft when you started. Next time, cut cold butter into the flour like pie dough.
How long do baked cookies last? Unfrosted: 2 weeks in an airtight container at room temperature. Frosted: 5 days in the fridge. Freeze unfrosted baked cookies for up to 3 months – thaw on the counter for 30 minutes.
11. Call to action (comment, share, subscribe)
Alright, my fellow cookie champion – now it’s your turn. Bake a batch and tag me on Instagram or Pinterest so I can cheer for your perfect edges. Got a spreading disaster story from the past? Drop it in the comments – we’ve all been there, and your misery loves company.
Subscribe to the newsletter below for more no-fail baking recipes delivered every Tuesday. I promise no spam, just butter and sugar. And if this recipe saved your holiday sanity, hit that share button and send it to a friend who needs cookie therapy.
Conclusion
So there you have it: the only cut out sugar cookie recipe you’ll ever need. No spread, no stress, just sharp little works of art that taste as good as they look. The secret is powdered sugar, double chilling, and trusting the process.
I’ve baked these for every holiday from Valentine’s hearts to Halloween bats, and they never let me down. Go forth, roll cold dough, and impress everyone at the cookie swap. Don’t forget to leave a comment when your batch turns out perfect – I’ll be here celebrating with you.
Recipe Name: No-Spread Cut Out Sugar Cookies
Servings: 36 cookies (using 3-inch cutter)
Estimated Cost Per Serving: $0.25
Prep Time: 20 minutes (plus 2+ hours chilling)
Cook Time: 10 minutes
Total Time: 2 hours 30 minutes
Course: Dessert
Cuisine: American
Calories Per Serving: 110
Diet: Vegetarian
Difficulty: Easy
Ingredients
- 1 cup (226g) unsalted butter, cold, cut into cubes
- 1 cup (120g) powdered sugar (do not substitute granulated)
- 1 large egg, cold
- 1 teaspoon vanilla extract
- ½ teaspoon almond extract (optional, but amazing)
- 2 ½ cups (300g) all-purpose flour
- 1 ½ teaspoons baking powder
- ½ teaspoon salt
Instructions
First, whisk the dry ingredients in a medium bowl: flour, baking powder, and salt. Set aside.
In a large bowl, beat the cold butter and powdered sugar with an electric mixer on medium speed until combined and slightly fluffy, about 2 minutes. The mixture will look like damp sand – that’s correct.
Add the cold egg, vanilla, and almond extract (if using). Beat on low until just incorporated. Scrape down the sides.
Gradually add the dry ingredients, mixing on low until a crumbly dough forms. It will look dry at first, but keep mixing – it will come together.
Turn the dough onto a lightly floured surface and press it into a ball. Divide into two discs, wrap each in plastic, and refrigerate for at least 2 hours (or up to 3 days).
When ready to bake, preheat oven to 350°F (175°C). Line two baking sheets with parchment paper or silicone mats.
Remove one dough disc from the fridge. Roll it between two sheets of parchment paper to ¼-inch thickness. Cut shapes with your favorite cookie cutters.
Transfer cut cookies to the prepared baking sheets, spacing them 1 inch apart. Gather scraps, re-roll (chilling the scraps for 10 minutes first), and cut again.
Once the baking sheet is full, chill the cut cookies in the fridge for 15 minutes (or freezer for 10 minutes). Do not skip this step.
Bake for 9-11 minutes, until edges are just barely golden. The centers will look pale – that’s perfect. Cool on the baking sheet for 2 minutes, then transfer to a wire rack to cool completely.
Decorate with royal icing or enjoy plain. Store in an airtight container at room temperature for up to 2 weeks.