

You know that glorious moment when a warm, gooey pizookie arrives at your table? And then you see the price tag and choke on your iced tea. Yeah, we’ve all been there.
I’m here to save your wallet and blow your mind. This homemade cookie skillet beats any restaurant version, and it takes about twenty minutes start to finish.
No delivery fee. No tiny scoop of ice cream. Just a giant, shareable (or not) skillet cookie that’s crispy on the edges and molten in the center. Ready to bake?
1. Allergens
This recipe contains wheat, dairy, and eggs. It’s also packed with chocolate, which is fine for most people but can be a trigger for some.
For a gluten-free version, swap the all-purpose flour for a quality 1:1 gluten-free baking blend. For dairy-free, use vegan butter and dairy-free chocolate chips.
2. Ingredient notes & substitutions
Let’s talk butter. Use salted butter for that perfect salty-sweet contrast. If you only have unsalted, add an extra ¼ teaspoon of salt.
Brown sugar is non-negotiable here – it gives that chewy, caramelized flavor. White sugar makes the cookie too crisp. And please, spring for real vanilla extract. The imitation stuff tastes like sadness.
3. Pro tips
Don’t overmix your dough. Stir just until the flour disappears, or your pizookie will turn into a hockey puck.
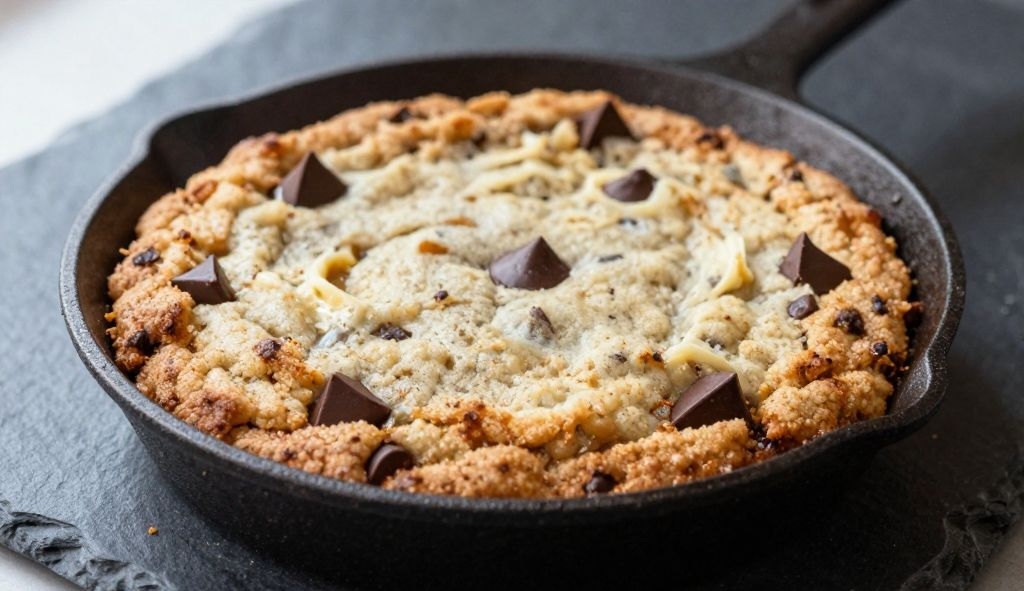
Use a 10-inch cast iron skillet for the best crispy edges. No cast iron? A 9-inch cake pan or pie dish works, but add two minutes to the bake time.
4. Storage & make-ahead (fridge/freezer)
You can prep the dough up to three days ahead. Just cover the bowl tightly and stash it in the fridge. Bring it to room temperature for fifteen minutes before baking.
To freeze, shape the dough into a disk right in the skillet, wrap the whole skillet in plastic, then foil. Bake from frozen – add eight to ten minutes. Freezes beautifully for up to three months.
5. Serving suggestions (complete the meal)
Obviously, you need vanilla ice cream on top while the pizookie is still hot. The melting ice cream creates a saucy, dreamy situation.
Drizzle with caramel sauce or chocolate syrup. Add a sprinkle of flaky sea salt. Serve with coffee or a cold glass of milk, and you’ve got a dessert that ends any dinner on a high note.
6. “Use your leftovers” (reduce waste)
Leftover pizookie? That’s a rare problem, but I’ve got you. Crumble it over yogurt for a breakfast that feels slightly rebellious.
Or rewarm individual slices in the microwave for ten seconds and top with peanut butter. You can even blend leftovers into milkshakes – cookie milkshakes are next-level amazing.
7. Common mistakes & how to fix them
Baking too long is the number one killer. The pizookie should look slightly underdone in the center when you pull it out. Carryover heat does the rest.
Another oops: using cold butter. Your dough won’t spread properly, and you’ll get a dense, bready mess. Always use room-temperature butter. If you forgot, cut it into small cubes and microwave for five seconds.
8. Variations by diet or flavor profile
Want a double chocolate pizookie? Replace two tablespoons of flour with cocoa powder and add white chocolate chips plus dark chips. That’s pure decadence.
For a vegan version, use flax eggs (one tablespoon ground flax + three tablespoons water per egg) and plant-based butter. Also try a salted caramel swirl – drop spoonfuls of caramel sauce into the dough before baking.
9. “Why this recipe works” / The science
The magic comes from more brown sugar than white sugar. Brown sugar has molasses, which is hygroscopic – it attracts and holds moisture. That keeps your pizookie chewy for hours.
The cast iron skillet conducts intense heat to the edges while the center stays softer. That contrast is what makes a pizookie superior to a regular cookie sheet cookie. Science, baby.
10. Frequently Asked Questions (FAQ)
Can I make this in individual ramekins? Absolutely. Divide dough among four greased 6-ounce ramekins and bake for 12–14 minutes. Watch them closely.
Why is my pizookie greasy? Your butter was too soft, almost melted. Next time, cream the butter and sugars just until combined – don’t go wild.
Do I need to grease the skillet? No. The butter in the dough plus the seasoned cast iron means zero sticking. If you’re using a regular pan, give it a light spray.
11. Call to action (comment, share, subscribe)
I need to hear about your pizookie adventures. Drop a comment below and tell me your favorite topping – is it caramel, hot fudge, or just a mountain of ice cream?
If you loved this recipe, share it with a friend who always drags you to that overpriced chain. And hit that subscribe button so you never miss another dessert victory.
Conclusion
So there you go. A homemade cookie skillet that’s actually better than the local spot, cheaper by miles, and way more fun to eat in your pajamas. You get to control the quality, the mix-ins, and the size of that ice cream scoop.
Bake this for a date night, a sad Tuesday, or just because you’re an adult who deserves warm chocolate in a cast iron pan. Make it once, and you’ll never pay fifteen bucks for a pizookie again.
Now preheat your oven. Your skillet is waiting.
Recipe Name: Better Than Your Local Pizookie – Homemade Cookie Skillet
Servings: 6
Estimated Cost Per Serving: $1.20
Prep Time: 10 minutes
Cook Time: 15 minutes
Total Time: 25 minutes
Course: Dessert
Cuisine: American
Calories Per Serving: 520
Diet: Vegetarian
Difficulty: Easy
Ingredients:
- 1/2 cup (113g) salted butter, room temperature (1 stick)
- 1/2 cup (100g) packed brown sugar
- 1/4 cup (50g) granulated sugar
- 1 large egg, room temperature
- 2 teaspoons vanilla extract
- 1 1/2 cups (190g) all-purpose flour
- 1/2 teaspoon baking soda
- 1/4 teaspoon salt (omit if using salted butter)
- 1 cup (170g) semi-sweet chocolate chips
- Optional: flaky sea salt for topping
Instructions:
First, preheat your oven to 350°F (175°C). Place a 10-inch cast iron skillet inside to heat up while you make the dough – this helps create those crispy edges.
In a large bowl, cream the butter, brown sugar, and granulated sugar together with a spatula or electric mixer until light and fluffy, about 2 minutes. Add the egg and vanilla, mixing until combined.
In a separate small bowl, whisk the flour, baking soda, and salt. Gradually add the dry ingredients to the wet mixture, stirring just until no flour streaks remain. Do not overmix. Fold in the chocolate chips.
Carefully remove the hot skillet from the oven (use an oven mitt!). Press the cookie dough evenly into the skillet, spreading it almost to the edges.
Bake for 14 to 16 minutes. The edges should be golden brown and the center will look slightly underdone – that’s exactly what you want. Let the pizookie cool in the skillet for 5 minutes.
Sprinkle with flaky sea salt if you like. Top with a generous scoop of vanilla ice cream, and serve warm right from the skillet. Grab spoons and dig in.