

You don’t need a pastry degree to nail apple pie. Seriously. I’ve burned my share of crusts and cried over soupy fillings, but this recipe is the one that finally worked every time.
This apple pie is foolproof because we’re using a few smart tricks (no, not a store-bought crust unless you want to – no judgment here).
Grab your apples and a glass of something cold. Let’s make the pie that’ll have your friends asking for the recipe.
1. Allergens
This classic apple pie contains wheat (gluten) from the flour in the crust, plus dairy from butter in both the crust and filling. The apples themselves are naturally allergen-free.
Eggs and nuts are not in this recipe, so that’s good news if you’re avoiding those. However, always check your specific ingredients – some store-bought crusts add weird stuff.
For a gluten-free version, use a 1:1 gluten-free flour blend with cold vegan butter. For dairy-free, swap the butter for vegan butter or coconut oil. The filling still works beautifully.
2. Ingredient notes & substitutions
You’ll need 2 pie crusts (homemade or store-bought), 6-7 medium apples, 3/4 cup sugar, 2 tbsp flour, 1 tsp cinnamon, 1/4 tsp nutmeg, 2 tbsp lemon juice, and 2 tbsp butter. For apples: Granny Smith gives tartness, Honeycrisp or Braeburn add sweetness. Mix them for the best flavor.
3. Pro tips
Peel your apples – nobody wants chewy skin in a tender pie. Cut them into 1/4-inch slices, not chunks. Thin slices cook evenly and stack nicely.
Pre-cook the filling for 5 minutes on the stovetop. This releases excess liquid so your pie isn’t a soupy mess. Just toss apples with sugar, spices, and lemon juice, then cook until juices thicken slightly.
Keep your butter and dough cold. Warm butter makes a tough crust. If your kitchen is hot, chill the rolled-out crust for 15 minutes before filling.
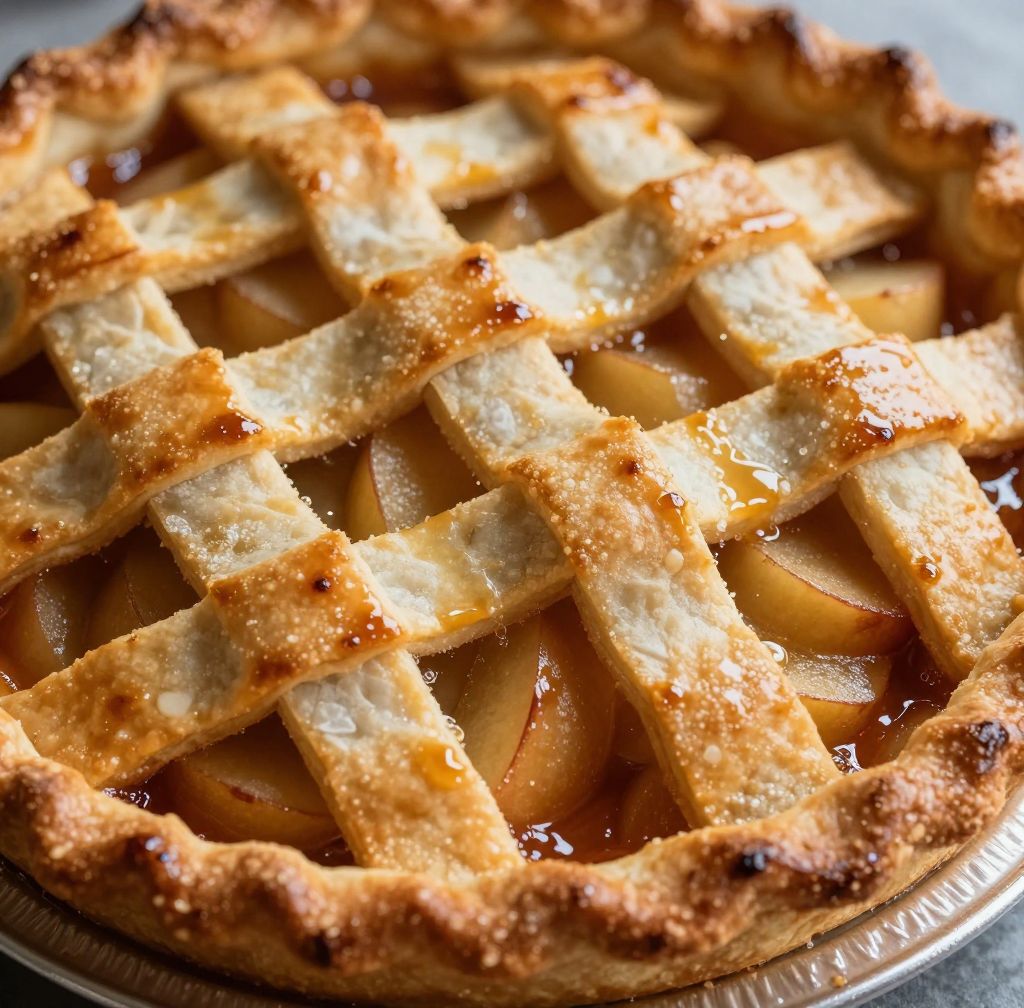
Cut vents in the top crust or use a lattice. Steam needs to escape, or your pie will explode in the oven. (Dramatic, but true.) Brush with egg wash for a golden shine.
4. Storage & make-ahead
Fridge: Baked apple pie keeps for 4-5 days covered at room temperature? Actually better to refrigerate after day 1. I keep mine in the fridge – cold pie for breakfast is a win.
Freezer: You can freeze the unbaked pie (assembled in a disposable pan) for up to 3 months. Bake from frozen, adding 15-20 minutes. Or freeze the baked pie, then reheat at 350°F for 20 minutes.
5. Serving suggestions
Serve warm with a scoop of vanilla ice cream. The hot-cold contrast is basically a hug for your taste buds.
Whipped cream works too, especially if you’re out of ice cream. Add a sprinkle of cinnamon on top for extra flair.
For a savory twist, a slice of sharp cheddar cheese on the side is a classic New England move. Don’t knock it ’til you try it.
Caramel sauce drizzled over the top turns this into a dessert that’ll make you forget about cake forever.
Coffee or black tea cuts the sweetness perfectly. Serve pie for brunch – I won’t tell anyone.
6. Use your leftovers
Leftover apple pie? What’s that? But okay, if you somehow have a slice left, breakfast pie is a thing. Cold slice with coffee.
Crumble it over yogurt for a crunchy, sweet parfait. Layer pie chunks, Greek yogurt, and a drizzle of honey.
Apple pie milkshake – blend a slice with vanilla ice cream and a splash of milk. It’s ridiculous and amazing.
Freeze individual slices wrapped in foil. Then microwave for 30 seconds when a craving hits at 10 PM.
Turn into pie pops by crumbling the leftover pie, mixing with a little cream cheese, and rolling into balls. Dip in chocolate.
Or just eat it with a fork over the sink at midnight. No judgment here. 🙂
7. Common mistakes & how to fix them
Soggy bottom crust – you didn’t pre-cook the filling or blind-bake the bottom. Fix: cook the filling on the stove first, or bake the pie on the lowest oven rack.
Runny filling – not enough thickener or undercooked apples. Use 2-3 tbsp of flour or cornstarch and let the pie cool completely before slicing. Warm pie is always runny.
Burned crust edges – cover them with foil or a pie shield after 20 minutes in the oven. I forgot this once and served a pie with charcoal rings. Not cute.
8. Variations by diet or flavor profile
Vegan: Use vegan butter and a plant-based crust (Crisco works). Gluten-free: Use GF flour blend. Low-sugar: Swap half the sugar with monk fruit sweetener. Add cranberries for tart pop, or chopped pecans for crunch. You do you.
9. Why this recipe works / The science
Pre-cooking the apples removes excess water. Raw apples release steam inside the crust, making it soggy. Cooking them first concentrates flavor and prevents the dreaded pie lake.
The two-crust method – bottom crust gets crispier when you brush it with egg wash before adding filling. That creates a barrier.
Sugar and salt balance – apples need both. The sugar draws out juice, then the heat thickens it. A pinch of salt in the crust makes the butter taste more buttery.
Letting the pie rest for 2 hours after baking allows the filling to set. Cutting too early = apple soup on a plate. Patience, grasshopper.
10. Frequently Asked Questions
Can I use canned apple filling? Sure, but it’s not the same. You’ll miss the texture and spice control. Add extra cinnamon to canned filling. Why is my pie bubbling over? Too much filling or not enough vents. Place a baking sheet under the pie to catch drips.
Do I have to refrigerate apple pie? Yes after 2 days at room temp. But honestly, I refrigerate after day 1 to be safe. Can I make this in a glass pie plate? Yes, reduce oven temp by 25°F and bake longer.
11. Call to action
Alright, now it’s your turn. Make this pie and tag me on Instagram – I want to see your golden, flaky creations.
Leave a comment below telling me what apple variety you used. Did you go all Granny Smith or mix it up? I read every single one.
Share this recipe with a friend who claims they can’t bake. Prove them wrong with this foolproof method.
Subscribe to my email list (box in the sidebar) for weekly recipes delivered to your inbox. No spam, just pie talk.
Got a baking fail story? Spill it in the comments. Misery loves company, and I’ve got plenty of my own burnt crust tales.
So there you have it – the best, most foolproof apple pie recipe that won’t make you cry into the flour bag. It’s easy, forgiving, and tastes like fall in a plate.
Remember: cold butter, pre-cooked apples, and patience while it cools. That’s the holy trinity of great pie. Now go preheat your oven.
And when someone asks for the recipe (they will), send them right here. Happy baking, friend!
Recipe Name: Best Apple Pie Recipe (Foolproof & Easy)
Servings: 8 slices
Estimated Cost Per Serving: $1.25
Prep Time: 20 minutes
Cook Time: 50 minutes
Total Time: 1 hour 10 minutes (plus 2 hours cooling)
Course: Dessert
Cuisine: American
Calories Per Serving: 380
Diet: Vegetarian
Difficulty: Easy
Ingredients:
2 homemade or store-bought pie crusts (for 9-inch pie)
6 cups thinly sliced, peeled apples (about 6-7 medium apples, mix of Granny Smith and Honeycrisp)
3/4 cup granulated sugar
2 tablespoons all-purpose flour (or cornstarch for gluten-free)
1 teaspoon ground cinnamon
1/4 teaspoon ground nutmeg
1/4 teaspoon salt
2 tablespoons fresh lemon juice
2 tablespoons unsalted butter, cut into small pieces
1 egg beaten with 1 tablespoon water (for egg wash, optional)
Instructions:
- Preheat oven to 400°F (200°C). Place a baking sheet on the lower rack to catch drips.
- In a large bowl, toss the sliced apples with lemon juice. Add sugar, flour, cinnamon, nutmeg, and salt. Mix well.
- Transfer the apple mixture to a large skillet or saucepan. Cook over medium heat for 5 minutes, stirring occasionally, until the juices thicken slightly. Remove from heat and stir in the butter pieces until melted.
- Roll out one pie crust and fit it into a 9-inch pie plate. Trim the edges, leaving a 1/2-inch overhang.
- Pour the warm apple filling into the crust. Dot with any remaining butter if not fully melted.
- Roll out the second crust. Place it over the filling. Trim and crimp the edges together. Cut several slits in the top crust for steam vents.
- Brush the top crust with egg wash (optional for shine). If the edges brown too fast, cover them with foil after 20 minutes.
- Bake for 45-50 minutes, until the crust is golden brown and the filling is bubbly through the vents.
- Cool the pie on a wire rack for at least 2 hours before slicing. This step is crucial – the filling will set as it cools.
- Serve warm or at room temperature with ice cream or whipped cream.