
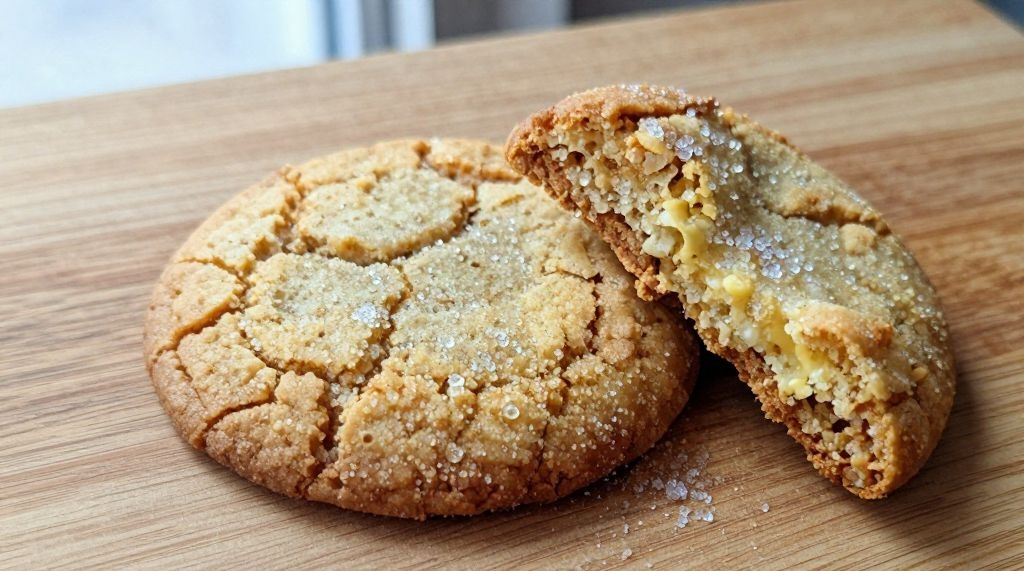

You know that perfect sugar cookie – the one with a crisp, crackly shell that gives way to a soft, buttery center? That’s exactly what we’re making today.
No dry, cakey disks here. We’re chasing that chewy bite and a top so golden and cracked it looks like a little stained-glass window.
Grab your butter and let it come to room temperature. I promise these are easier than convincing yourself to fold that third basket of laundry.
1. Allergens
These chewy sugar cookies contain wheat (gluten), dairy (butter), and eggs. If you’re baking for someone with celiac disease or a severe allergy, please take that seriously.
The flour and butter are non-negotiable for this exact texture, but I’ve got you covered on swaps in the variations section below.
Cross-contamination warning: If you use shared equipment (like a stand mixer that’s touched nuts), trace amounts may remain. When in doubt, ask your guests directly.
I once made these for a friend who’s lactose intolerant, thinking a “tiny bit” of butter was fine. It was not fine. Learn from my mistake.
2. Ingredient notes & substitutions
Unsalted butter is best here – it lets you control the salt. If you only have salted butter, reduce the added salt by half and cross your fingers (it’ll still work).
Brown sugar + white sugar is the secret to chewiness. All white sugar gives you a crisper cookie; all brown gives you a softer, molasses-y vibe. Do a 50/50 split for that perfect in-between.
Don’t have cream of tartar? You can skip it and use an extra 1/4 tsp baking soda. But cream of tartar helps with that crackly top, so grab a small jar – it lasts forever.
3. Pro tips
Chill your dough for at least 30 minutes. I know, I know – you want cookies now. But cold dough spreads less, bakes thicker, and cracks more dramatically on top.
Roll the dough balls in coarse sparkling sugar instead of regular granulated sugar. It doesn’t melt as fast, so you get a shinier, crunchier crust that looks straight out of a bakery.
Use a cookie scoop (about 1.5 tablespoons) for uniform size. My first batch had tiny sad cookies next to mutant giants. Not cute.
Line your baking sheet with parchment paper, not a silicone mat. Silicone mats insulate the bottom and can prevent that golden browning. Parchment lets the heat hit hard.
Take the cookies out when the edges are just set but the centers still look slightly underdone. They’ll continue baking on the hot sheet. Trust the process.
4. Storage & make-ahead (fridge/freezer)
Baked cookies stay chewy for up to 5 days in an airtight container at room temperature. Throw in a slice of plain bread – it absorbs excess moisture and keeps them soft. Replace the bread daily.
In the fridge? Not recommended for baked cookies. The cold dries them out and makes the texture weird. Just keep them on the counter.
Freeze the dough, not the baked cookies. Roll the dough into balls, pop them on a parchment-lined tray, freeze until solid (about 2 hours), then transfer to a zip-top bag. They’ll keep for 3 months.
When you’re ready to bake, add 2-3 minutes to the bake time – no need to thaw. Straight from freezer to oven is my favorite lazy life hack.
Make-ahead tip: You can refrigerate the dough for up to 48 hours. Just wrap it tightly in plastic so it doesn’t pick up fridge smells (nobody wants leftover garlic cookie vibes).
The longer it chills, the deeper the caramel-like flavor gets. So if you have patience (I don’t, but you might), go for the full 48 hours.
5. Serving suggestions
These cookies are perfect with a cold glass of milk – the classic dunking combo. For a fancier twist, serve them alongside a scoop of vanilla bean ice cream and a drizzle of salted caramel.
They also make a killer base for ice cream sandwiches. Just flatten the dough balls a bit before baking so you get flatter cookies.
Feeling brunch-y? Crumble one over a bowl of Greek yogurt with fresh berries. It’s like dessert for breakfast, and I fully support that life choice.
6. Use your leftovers
Crush up the extra cookies into coarse crumbs and use them as a pie crust or cheesecake topping. Mix with melted butter, press into a pan, and bake for 10 minutes – you’ve got a no-fuss cookie crust.
7. Common mistakes & how to fix them
Overmixing the dough develops too much gluten, which leads to tough, bread-like cookies. Mix just until the flour disappears – then stop. I promise the dough doesn’t need a full workout.
Skipping the chill results in flat, greasy puddles instead of chewy rounds. If your first batch spreads like crazy, scoop the remaining dough back into the bowl and refrigerate for 20 minutes. Problem solved.
Using melted butter is tempting because it’s faster, but it gives you thin, crispy cookies. Creamed room-temp butter + sugar creates air pockets, which gives you that lift and crackle. Don’t microwave your butter.
Baking too long kills the chew. The second the edges are golden and the center looks a little dull (not wet), pull them out. They’ll firm up as they cool on the pan.
Not enough sugar coating means a smooth, boring top. Roll the dough balls generously – like, really coat them – then give them a second roll after shaping. Crackles need sugar to grab onto.
8. Variations by diet or flavor profile
Gluten-free version: Swap the all-purpose flour for a cup-for-cup gluten-free blend (like King Arthur or Bob’s Red Mill). Add 1/4 tsp xanthan gum if your blend doesn’t have it. The texture will be slightly more crumbly but still chewy.
Vegan option: Use vegan butter (country Crock plant butter works great) and a flax egg (1 tbsp ground flax + 3 tbsp water, let sit 5 minutes). The cookies will spread a bit more, so chill the dough for an extra 15 minutes.
Lemon sugar cookies: Add 2 tablespoons of fresh lemon zest and 1/2 teaspoon of lemon extract to the wet ingredients. Roll the dough balls in lemon-infused sugar (rub lemon zest into the sugar first). So bright and zingy.
Snickerdoodle twist – add 1 tablespoon of cinnamon to the rolling sugar. You’ll get that classic tang from the cream of tartar plus a cozy cinnamon hug. Wear your sweatpants for this one.
9. Why this recipe works / The science
Brown sugar brings moisture thanks to its molasses content. That moisture stays locked in during baking, which means a softer, chewier interior that doesn’t dry out after a day.
Cream of tartar is an acid that prevents sugar crystals from getting too big. Smaller crystals = more cracks on the surface as the cookie expands in the oven. It’s like controlled chaos for your taste buds.
The high oven temperature (375°F) sets the outside quickly while the inside stays slightly underdone. Pull them at exactly 9 minutes, and the residual heat finishes the job without turning the whole thing into a hockey puck.
Rolling the dough in granulated sugar creates tiny abrasions on the ball’s surface. As the cookie spreads, those scratches turn into fault lines – a.k.a. those gorgeous golden cracks we’re all here for.
10. Frequently Asked Questions (FAQ)
Why are my cookies not crackling? You probably didn’t roll them in enough sugar, or your oven wasn’t hot enough. Use an oven thermometer – most home ovens lie by 25-50 degrees. Also, make sure your baking soda and cream of tartar are fresh (replace every 6 months).
Can I make these without a stand mixer? Absolutely. A hand mixer on medium speed works fine, or even a wooden spoon and some elbow grease. Just cream the butter and sugar for a full 3-4 minutes until it’s pale and fluffy – that’s the arm workout part.
Why did my cookies turn out cakey? You used too much flour (scoop your measuring cup into the bag and level it – don’t pack it) or you overmixed. Cakey cookies also happen when you use baking powder instead of the combo of baking soda + cream of tartar. Double-check your ingredients.
Can I double this recipe? Yes! It scales beautifully to 48 cookies. Just bake in batches and don’t crowd the pan – leave 2 inches between each dough ball.
How do I get that perfect golden top without burning the bottoms? Bake on the middle rack and rotate your pan halfway through. If your oven runs hot, drop the temp to 365°F. Dark metal sheets brown faster, so reduce bake time by 1 minute.
My cookies came out too thin and greasy. What happened? Your butter was too soft (almost melted) or you didn’t chill the dough. Pop the sheet of raw dough balls into the freezer for 15 minutes before baking next time. This is the #1 fix for sad flat cookies.
11. Call to action (comment, share, subscribe)
Alright home baker – now it’s your turn. Drop a comment below and tell me how your crackly tops turned out. Did you go for the lemon version or keep it classic?
If you loved these, share this post with a friend who needs a foolproof sugar cookie in their life. And don’t forget to subscribe to my email list – I send out two new recipes every week, plus the occasional rant about why bread machines are overrated.
Conclusion
These chewy sugar cookies with a golden, crackly top are everything you want in a classic dessert: crisp edges, soft centers, and that satisfying snap when you bite in. The best part? You probably already have every ingredient in your pantry.
Make a batch this weekend, eat one warm from the oven (you’ve earned it), and watch the rest disappear before you can say “baking soda.” Seriously – hide a few for yourself. Future you will thank present you.
Now go preheat that oven. And please, for the love of cookies, chill the dough.
Recipe Name: Chewy Sugar Cookies with a Golden, Crackly Top
Servings: 24 cookies
Estimated Cost Per Serving: $0.18
Prep Time: 15 minutes
Cook Time: 10 minutes (per batch)
Total Time: 55 minutes (includes 30 min chill)
Course: Dessert
Cuisine: American
Calories Per Serving: 125
Diet: Vegetarian
Difficulty: Easy
Ingredients
- 2 1/2 cups (315g) all-purpose flour
- 1/2 teaspoon baking soda
- 1/2 teaspoon cream of tartar
- 1/2 teaspoon salt
- 1 cup (226g) unsalted butter, softened to room temperature
- 1/2 cup (100g) granulated sugar
- 1/2 cup (100g) packed light brown sugar
- 1 large egg, room temperature
- 2 teaspoons vanilla extract
- 1/3 cup (65g) coarse sparkling sugar or granulated sugar, for rolling
Instructions
First, whisk the flour, baking soda, cream of tartar, and salt together in a medium bowl. Set aside.
In a large bowl using a hand mixer or stand mixer fitted with the paddle attachment, beat the softened butter, granulated sugar, and brown sugar on medium speed until pale and fluffy, about 3 minutes. Scrape down the sides as needed.
Add the egg and vanilla extract. Beat on medium speed until combined, about 1 minute. The mixture might look slightly curdled – that’s fine.
Gradually add the dry ingredients to the wet ingredients, mixing on low speed just until the flour disappears. Do not overmix. The dough will be soft and slightly sticky.
Cover the bowl with plastic wrap and refrigerate for at least 30 minutes (or up to 48 hours). Chilling is mandatory for the crackly top.
Preheat your oven to 375°F (190°C). Line two baking sheets with parchment paper. Pour the rolling sugar into a small shallow bowl.
Scoop chilled dough into 1.5-tablespoon balls (about 30g each). Roll each ball between your palms until smooth, then roll generously in the sugar until completely coated. Place on the prepared baking sheets 2 inches apart.
Bake one sheet at a time on the middle rack for 9-10 minutes, or until the edges are set and lightly golden brown. The centers will look slightly underdone – that’s exactly what you want.
Let the cookies cool on the baking sheet for 5 minutes (they’ll continue to firm up and crack). Then transfer to a wire rack to cool completely. Repeat with remaining dough.
Store in an airtight container at room temperature for up to 5 days. Or freeze the dough balls for later.