

Let’s be honest – scraping the last spoonful from a Ben & Jerry’s pint is a beautiful tragedy. But what if you could make a batch so good, so outrageously creamy, that you’d never look at that freezer aisle the same way?
This isn’t one of those ‘healthy’ imposters that tastes like frozen sadness. We’re talking about real custard base, real chocolate chunks, and a fudge ripple that borders on reckless.
Grab your ice cream maker and prepare for some serious self-control issues. You’ve been warned.
1. Allergens
This recipe contains dairy (heavy cream, whole milk), eggs, gluten (from brownies), and soy (from chocolate or brownie mix). If you use store-bought brownies, check for nut warnings – many are processed on shared equipment.
For a dairy‑free version, swap the cream and milk for full‑fat canned coconut milk and use a vegan butter. Just know the texture will be slightly less rich, but still delicious.
2. Ingredient notes & substitutions
Heavy cream and whole milk are non‑negotiable for that dense, scoopable texture. Low‑fat dairy will give you ice crystals the size of gravel, so don’t do it.
The egg yolks create the custard base that makes Ben & Jerry’s so luscious. You can try a cornstarch‑thickened Philadelphia‑style base (no eggs), but the flavor won’t be as deep.
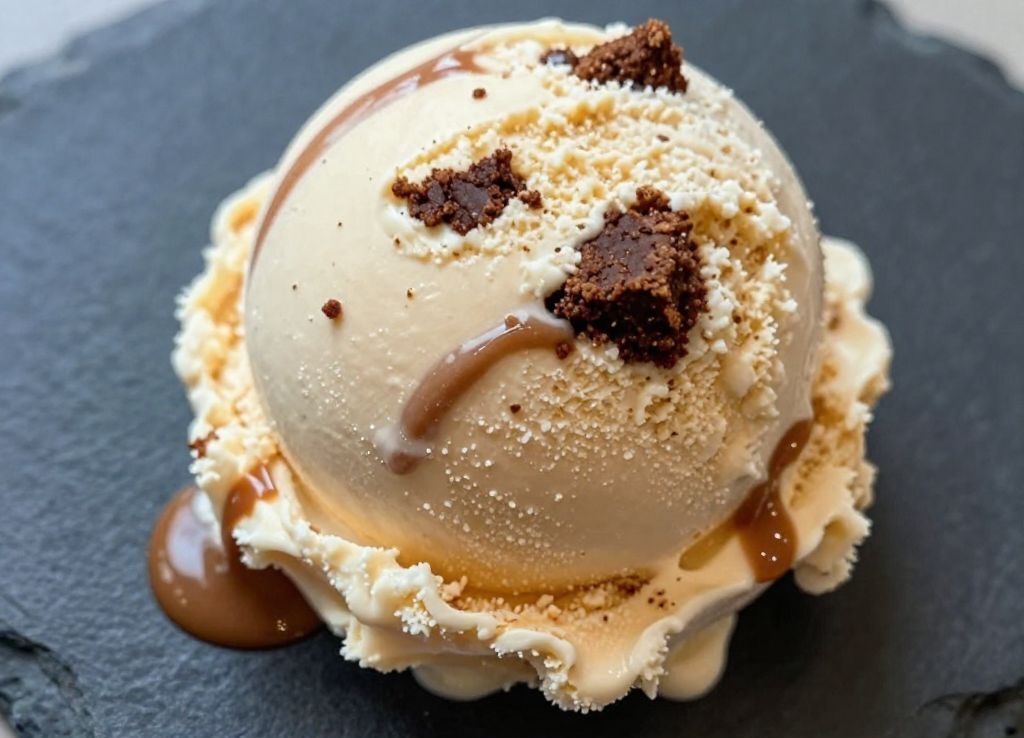
For the brownie chunks, bake your favorite fudgy brownies (box mix is fine, I won’t judge) and chop them into bite‑sized pieces. Stale brownies are even better – they absorb less moisture.
Dark chocolate (60‑70% cacao) gives the fudge ripple its bitter edge. Milk chocolate will make it cloyingly sweet, so stick with dark.
Corn syrup (just a tablespoon) is the secret to preventing icy texture. Don’t skip it – it doesn’t make it taste like corn, I promise.
3. Pro tips
Chill your custard completely before churning. Like, overnight chilled. Warm custard in the machine = milkshake, not ice cream. I learned this the hard way after a 2am disaster.
Pre‑freeze your ice cream maker bowl for at least 24 hours. Shake it – if you hear liquid sloshing, put it back in the freezer. No slosh, no problem.
Fold in mix‑ins after churning, not during the last minute. The machine just smashes brownies into dust. Transfer the soft ice cream to a bowl, then gently stir in your chunks and swirls.
Don’t over‑churn. Once it looks like soft serve (about 20‑25 minutes), stop. Over‑churning whips in too much air, and you’ll get fluffy, low‑density ice cream that melts instantly.
Press plastic wrap directly onto the surface before freezing. This prevents that nasty ice crystal crust from forming. Yes, it’s annoying. Yes, it’s worth it.
Let the finished ice cream sit at room temp for 5‑10 minutes before scooping. Straight from the freezer, it’s brick‑hard. Patience, young grasshopper.
4. Storage & make-ahead (fridge/freezer)
Store in an airtight container with that plastic wrap pressed on top. It’ll keep well for up to two weeks – but let’s be real, it won’t last that long.
You can make the custard base up to three days ahead. Just keep it covered in the fridge, then churn when you’re ready.
Don’t refreeze melted ice cream. Once it thaws, the emulsion breaks, and re‑churning gives you a gritty, sad mess. Eat it all in one sitting like an adult.
5. Serving suggestions (complete the meal)
Warm a slice of brownie or a chewy chocolate chip cookie, then top with a scoop of this ice cream. The hot‑cold contrast is basically a hug for your mouth.
6. “Use your leftovers” (reduce waste)
Leftover egg whites from the custard? Make a batch of white chocolate macadamia nut cookies or a fluffy angel food cake. Never throw away egg whites – they freeze perfectly for months.
Got extra brownie chunks? Crumble them over yogurt, blend into milkshakes, or just eat them straight from the bag. No judgment here.
The used vanilla bean pod (if you used one) can be rinsed, dried, and buried in a jar of sugar. In two weeks, you’ll have homemade vanilla sugar for your coffee or next batch of cookies.
Leftover ice cream that’s slightly icy? Blend it into a milkshake with a splash of milk. Problem solved.
7. Common mistakes & how to fix them
Ice crystals forming? You either skipped the corn syrup or didn’t chill the custard enough. Next time, add 1 tablespoon of vodka or bourbon – alcohol lowers the freezing point and keeps things creamy. (The booze flavor bakes off during churning, mostly.)
Ice cream too hard to scoop? Your freezer might be too cold. Move the container to the door or the top shelf. And always let it soften on the counter for 5‑10 minutes before digging in.
8. Variations by diet or flavor profile
Vegan version: Replace dairy with full‑fat canned coconut milk (two cans) and use a vegan butter. Omit the eggs and use 2 tablespoons cornstarch + 3 tablespoons water as a thickener. Use vegan brownies.
Lower sugar: Swap half the sugar for allulose or erythritol. The texture will be slightly softer, but it still scoops beautifully.
Peanut butter cup: After churning, fold in chopped peanut butter cups and a 1/2 cup of melted peanut butter swirled in. You’ll thank me later.
Mint chocolate chip: Add 1 teaspoon peppermint extract (not mint – it tastes like toothpaste) and green food coloring if you’re feeling nostalgic. Use mini chocolate chips instead of brownie chunks.
Coffee lover’s: Steep 1/4 cup of coarse ground coffee beans in the hot cream mixture for 15 minutes, then strain. Add the brownie chunks and a fudge ripple for a mocha dream.
9. Why this recipe works (The science)
Egg yolks contain lecithin, a natural emulsifier that binds fat and water together. That’s why custard‑based ice cream is so silky – no icy water pockets.
Corn syrup is an invert sugar, meaning it interferes with ice crystal formation. Table sugar (sucrose) can’t do this alone, so that little tablespoon of corn syrup is your texture hero.
Heavy cream has a high fat content (around 36%), which coats your tongue and prevents the cold from feeling harsh. Ben & Jerry’s uses a similar ratio – we’re just cloning it at home.
Chilling the base before churning ensures the fat globules partially solidify. When the dasher spins, those globules clump together and trap air, giving you that dense, chewy scoop.
The brownie chunks are coated in butter and sugar, which means they resist absorbing water from the ice cream. If you used raw cake batter, it would turn to mush. Science wins again.
10. Frequently Asked Questions (FAQ)
Can I make this without an ice cream maker? Yes, but it’s a workout. Pour the chilled custard into a shallow pan, freeze for 45 minutes, then whisk vigorously. Repeat every 30 minutes for 3‑4 hours until creamy. Or just spend $50 on a freezer bowl maker – your arms will thank you.
Why is my ice cream icy even though I followed everything? Two culprits: your freezer cycles temperature (store the container toward the back), or you didn’t press plastic wrap onto the surface. Fix both on your next batch.
Can I double the recipe? Totally. But churn it in two batches unless you have a commercial machine. Overfilling the bowl = overflow city and a sticky mess.
11. Call to action (comment, share, subscribe)
Drop a comment below with your favorite Ben & Jerry’s flavor – I’ll tell you how to clone it next. And if this recipe saved you $4 per pint, hit that share button and annoy your foodie friends.
Now go make some magic. I’ll wait right here for your success stories (and your inevitable “I ate the whole batch in one night” confessions).
Conclusion
This ice cream is the real deal. It’s rich, it’s fudgy, it’s packed with chewy brownie chunks, and honestly, it might ruin store‑bought for you forever.
The first time I made it, I sat on my kitchen floor with the entire container and a spoon. No regrets. You’ve got the recipe, the tips, and the science – now all you need is a little freezer space and some self‑control. (Okay, maybe skip the self‑control.)
Make it, love it, and when someone asks for the recipe, send them right back here. Happy churning, friends.
Recipe Name: Better Than Ben & Jerry’s Chocolate Fudge Brownie Ice Cream
Servings: 6
Estimated Cost Per Serving: $1.50
Prep Time: 20 minutes
Cook Time: 10 minutes (plus 4+ hours chilling and churning)
Total Time: 4 hours 30 minutes (mostly inactive)
Course: Dessert
Cuisine: American
Calories Per Serving: 450
Diet: Vegetarian (gluten-free option available)
Difficulty: Medium
Ingredients
For the custard base:
- 2 cups heavy cream
- 1 cup whole milk
- 3/4 cup granulated sugar
- 1 tablespoon light corn syrup (don’t skip)
- 1/4 teaspoon fine sea salt
- 5 large egg yolks
- 2 teaspoons vanilla extract (or 1 vanilla bean, scraped)
For the fudge ripple:
- 1/2 cup dark chocolate (60-70%), finely chopped
- 1/4 cup heavy cream
- 2 tablespoons granulated sugar
- 1 tablespoon unsalted butter
- Pinch of salt
For the brownie chunks:
- 1 cup homemade or store-bought fudgy brownies, cut into 1/2-inch cubes (about 4-5 brownies)
Instructions
First, make the custard. In a medium saucepan, combine the heavy cream, whole milk, 1/2 cup of the sugar, the corn syrup, and salt. Heat over medium heat, stirring occasionally, until it just begins to steam and small bubbles form around the edge – do not boil.
While the cream heats, whisk the egg yolks with the remaining 1/4 cup sugar in a separate bowl until pale and slightly thickened, about 2 minutes.
Slowly pour about 1 cup of the hot cream mixture into the egg yolks while whisking constantly. This tempers the eggs so they don’t scramble. Then pour the egg mixture back into the saucepan.
Cook over medium-low heat, stirring constantly with a silicone spatula or wooden spoon, until the custard thickens enough to coat the back of the spoon (about 5-7 minutes). It should leave a clear path when you drag your finger across the coated spoon.
Remove from heat and stir in the vanilla extract (or vanilla bean seeds). Pour the custard through a fine-mesh strainer into a clean bowl to remove any cooked egg bits. Let it cool to room temperature, then cover and refrigerate for at least 4 hours – overnight is better.
Now make the fudge ripple. In a small saucepan, combine the dark chocolate, 1/4 cup heavy cream, 2 tablespoons sugar, butter, and salt. Warm over low heat, stirring constantly, until smooth and glossy. Remove from heat and let cool to room temperature. It will thicken as it cools.
Once the custard is fully chilled, pour it into your pre-frozen ice cream maker bowl and churn according to the manufacturer’s instructions, about 20-25 minutes, until it looks like thick soft serve.
While the ice cream churns, place the brownie cubes in the freezer on a small baking sheet. This keeps them from turning to mush when you fold them in.
When churning is complete, transfer the soft ice cream to a large chilled bowl. Drizzle half the fudge ripple over the top, then sprinkle with half the frozen brownie cubes. Gently fold a few times with a spatula. Add the remaining fudge ripple and brownie cubes, and fold just until swirled – don’t overmix.
Scoop the ice cream into an airtight container. Press a piece of plastic wrap directly onto the surface, then seal with the lid. Freeze for at least 4 hours or until firm enough to scoop.
When you’re ready to serve, let the container sit at room temperature for 5-10 minutes. Then scoop, top with extra brownie if you’re feeling wild, and try not to eat the whole thing in one sitting.