
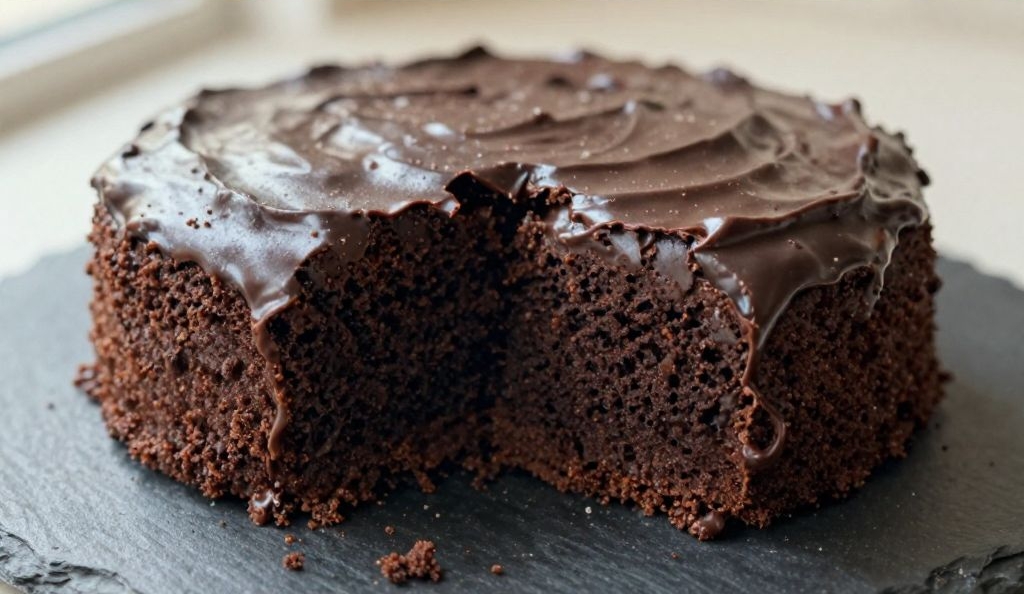

You know a cake is serious when it makes your fork look like it just took a dip in a chocolate fountain. That’s exactly what this luscious fudge cake does – rich, dark, and so velvety that every bite leaves a glossy smear behind.
I’m talking about the kind of dessert that makes you close your eyes and forget about the dishes. And yes, you’ll need a glass of milk or a strong coffee to go with it.
1. Allergens
This cake contains wheat (gluten), eggs, and dairy (butter, milk). Depending on the chocolate you use, it may also contain soy lecithin – check your chocolate bar or cocoa powder label to be sure.
2. Ingredient notes & substitutions
Let’s talk chocolate first. Use a high-quality unsweetened cocoa powder, like Dutch-processed, for that deep, dark color and smooth taste. Natural cocoa works too, but the cake won’t be quite as fudgy. For the melted chocolate, grab a bar of semi-sweet or bittersweet (60-70% cacao) – skip the chocolate chips because they have stabilizers that mess with the texture.
Butter is non-negotiable for that rich mouthfeel, but you can swap in vegan butter and a flax egg if you need dairy-free and egg-free. The buttermilk is a secret weapon – it makes the crumb tender and adds a tang that balances the sweetness. No buttermilk? Mix 1 tablespoon of white vinegar or lemon juice into regular milk and let it sit for 5 minutes.
Sugar is just plain granulated here. Brown sugar would make it too moist and sticky, so resist the urge. And finally, a little hot coffee (or hot water) blooms the cocoa and brings out chocolate’s best self – you won’t taste the coffee, I promise.
3. Pro tips
Do not overmix the batter once the flour goes in. Stir just until you don’t see white streaks, then stop. Overmixing develops gluten, and gluten is the enemy of a tender fudge cake.
Also, grease your cake pan like you mean it – butter and cocoa powder dusting works better than flour. The cocoa powder prevents that weird white flour residue on your dark cake.
4. Storage & make-ahead (fridge/freezer)
This cake stays moist at room temperature for up to three days, but only if you wrap it tightly in plastic. Do not leave it uncovered – chocolate cake dries out faster than you’d think. For longer storage, pop it in the fridge for up to a week, but let it come to room temperature before serving so the fudge texture returns.
Freezing is a dream here. Wrap the cooled cake (whole or in slices) in two layers of plastic wrap, then a layer of foil. It’ll keep for three months. To thaw, move it to the fridge overnight or leave slices on the counter for an hour.
You can also bake the cake a day ahead – just keep it wrapped at room temperature. The flavors actually deepen overnight, so go ahead and call it a win.
If you’re making the frosting ahead (and you should, because homemade frosting is life), store it in an airtight container in the fridge for up to a week. Let it soften at room temperature for an hour, then rewhip briefly before frosting the cake.
5. Serving suggestions (complete the meal)
This fudge cake is a showstopper on its own, but let’s complete the meal, shall we? Serve a warm slice with a scoop of vanilla bean ice cream – the hot-cold contrast is pure magic. Drizzle with a simple raspberry sauce (just cook down frozen raspberries with a little sugar) for a tart punch that cuts through the richness.
For a cozy winter dessert, dust the plate with powdered sugar and add a few fresh mint leaves. Or go all-out: spoon over a salted caramel sauce and sprinkle flaky sea salt on top. The salt makes the chocolate sing.
If you’re feeding a crowd, serve the cake in small wedges alongside espresso or a dark rum cocktail. It’s also incredible crumbled over a bowl of chocolate pudding – double chocolate, zero regrets.
On a casual weeknight, just pour a tall glass of oat milk and call it dinner. I won’t judge, and neither will your fork.
6. “Use your leftovers” (reduce waste)
Leftover fudge cake is a beautiful thing. Crumble it into a parfait glass with whipped cream and fresh berries for an instant dessert that looks fancy but takes two minutes. You can also blitz leftovers into cake pops: mix crumbs with a little frosting, roll into balls, and dip in melted chocolate.
Another trick? Warm a slice, chop it into chunks, and fold it into vanilla ice cream. Refreeze for a homemade chocolate chip-like situation. And if you have just a sad little end piece, microwave it for 10 seconds and spread it on toast. Yes, chocolate cake toast is a thing now, and it’s glorious.
7. Common mistakes & how to fix them
The number one mistake is pulling the cake out of the pan too early. Let it cool in the pan for exactly 15 minutes, then invert onto a rack. If you do it sooner, the cake will crack and stick. If you wait too long (over 30 minutes), condensation builds up and makes the bottom soggy. Set a timer.
8. Variations by diet or flavor profile
Want a dairy-free version? Swap the butter for coconut oil (use refined so it doesn’t taste like coconut) and the buttermilk for almond milk mixed with vinegar. Use vegan butter in the frosting too. For a gluten-free cake, substitute a quality 1:1 gluten-free flour blend that contains xanthan gum – I’ve had great luck with King Arthur’s measure-for-measure.
Feeling adventurous? Add 1/2 teaspoon of espresso powder to amp up the chocolate even more. Or fold in 1/2 cup of chopped toasted hazelnuts for a Ferrero Rocher vibe. For a peppermint twist, stir in 1/4 teaspoon of peppermint extract and top with crushed candy canes.
You can also turn this into a layer cake by doubling the recipe and baking in two 8-inch rounds. Just adjust baking time to 22-25 minutes.
9. “Why this recipe works” / The science
Here’s the secret: boiling water or hot coffee. Hot liquid helps the cocoa powder “bloom,” releasing its fat molecules and deepening the chocolate flavor. That’s why the cake tastes so intensely fudgy without tons of extra chocolate. Plus, the combination of melted chocolate and cocoa powder gives you both structure and melt-in-your-mouth texture.
Buttermilk’s acidity reacts with baking soda to create tiny bubbles, making the cake tender. And the high fat content from butter and chocolate keeps everything moist for days. Science tastes delicious, doesn’t it?
10. Frequently Asked Questions (FAQ)
Can I use a different size pan? Yes – a 9×13-inch rectangular pan works, but bake for only 20-25 minutes and check with a toothpick. A Bundt pan needs about 35-40 minutes, but grease it very well.
Why is my cake dry? You either overbaked it or used natural cocoa instead of Dutch-processed. Natural cocoa is more acidic and can dry out the crumb. Next time, check the cake at the minimum bake time.
Can I make this without eggs? Absolutely. Substitute each egg with a “flax egg” (1 tablespoon ground flaxseed + 3 tablespoons water, let sit for 10 minutes). The texture will be slightly denser but still fudgy.
How do I know when it’s done? Insert a toothpick in the center – it should come out with a few moist crumbs, not wet batter. If it’s completely clean, you’ve gone too far.
Does the frosting need to be refrigerated? If you’re using a buttercream or ganache, it’s fine at room temperature for a day. For longer storage, refrigerate the frosted cake, but bring it to room temperature an hour before serving.
11. Call to action (comment, share, subscribe)
If you make this luscious fudge cake, I need to hear about it. Drop a comment below and tell me what you served it with – ice cream, caramel, or just a fork and a smile? Your kitchen wins help other home cooks, so don’t be shy.
Share a photo on Pinterest or Instagram and tag me so I can drool over your creation. And if you’re not subscribed to my newsletter yet, what are you waiting for? Subscribe now for more chocolate disasters turned chocolate victories delivered straight to your inbox every Friday.
Now go preheat that oven. Your fork is ready for its chocolate bath.
Conclusion
You did it – you made a cake that basically forces you to lick the plate. This fudge cake is my go-to for birthdays, bad days, and “it’s Tuesday” days. It’s easy enough for a weeknight but impressive enough for company.
So bake it, frost it (or don’t – naked cake works too), and take that first forkful. When you see the chocolate coat those tines, you’ll know exactly why we’re friends. Don’t forget to save a slice for breakfast. You earned it.
Now here’s the recipe. Print it, pin it, or just memorize it – you’ll be making this on repeat.
Recipe Name: Luscious Fudge Cake That Coats Your Fork in Chocolate
Servings: 8
Estimated Cost Per Serving: $1.25
Prep Time: 20 minutes
Cook Time: 35 minutes
Total Time: 55 minutes
Course: Dessert
Cuisine: American
Calories Per Serving: 520
Diet: None
Difficulty: Medium
Ingredients
For the cake:
- 1 cup (226g) unsalted butter, plus more for greasing
- 2 tablespoons unsweetened cocoa powder (for dusting the pan)
- 1 3/4 cups (350g) granulated sugar
- 2 large eggs, at room temperature
- 1 teaspoon vanilla extract
- 1 3/4 cups (220g) all-purpose flour
- 3/4 cup (75g) Dutch-processed cocoa powder
- 1 1/2 teaspoons baking soda
- 1/2 teaspoon salt
- 1 cup (240ml) low-fat buttermilk, at room temperature
- 1/2 cup (120ml) hot strong coffee or boiling water
- 4 ounces (115g) semi-sweet chocolate, melted and cooled slightly
For the chocolate frosting (optional but encouraged):
- 1/2 cup (113g) unsalted butter, softened
- 2 cups (240g) powdered sugar, sifted
- 1/4 cup (25g) Dutch-processed cocoa powder
- 3 tablespoons heavy cream or whole milk
- 1 teaspoon vanilla extract
- Pinch of salt
Instructions
First, preheat your oven to 350°F (175°C). Grease a 9-inch round cake pan (or 9-inch springform) with butter, then dust with the 2 tablespoons of cocoa powder. Tap out the excess.
In a large bowl, cream the butter and granulated sugar together with an electric mixer on medium speed until light and fluffy, about 3 minutes. Add the eggs one at a time, beating well after each addition. Mix in the vanilla extract.
In a separate bowl, whisk together the flour, 3/4 cup cocoa powder, baking soda, and salt. Gradually add half of this dry mixture to the butter mixture, mixing on low speed until just combined.
Pour in the buttermilk and mix until incorporated. Then add the remaining dry mixture, stirring until you see no more flour streaks. Finally, slowly stream in the hot coffee (or boiling water) while mixing on low – the batter will look very thin. That’s correct.
Fold in the melted semi-sweet chocolate with a rubber spatula until the batter is glossy and uniform. Do not overmix.
Pour the batter into your prepared pan. Bake for 30-35 minutes, or until a toothpick inserted in the center comes out with a few moist crumbs. Let the cake cool in the pan for exactly 15 minutes, then turn it out onto a wire rack to cool completely.
While the cake cools, make the frosting. Beat the softened butter in a bowl until creamy. Gradually add the powdered sugar and 1/4 cup cocoa powder, alternating with the cream, and beat until smooth. Mix in the vanilla and salt. If the frosting is too thick, add another tablespoon of cream.
Once the cake is completely cool, frost the top and sides (or just the top for a rustic look). Slice, serve, and watch that fork get coated.