
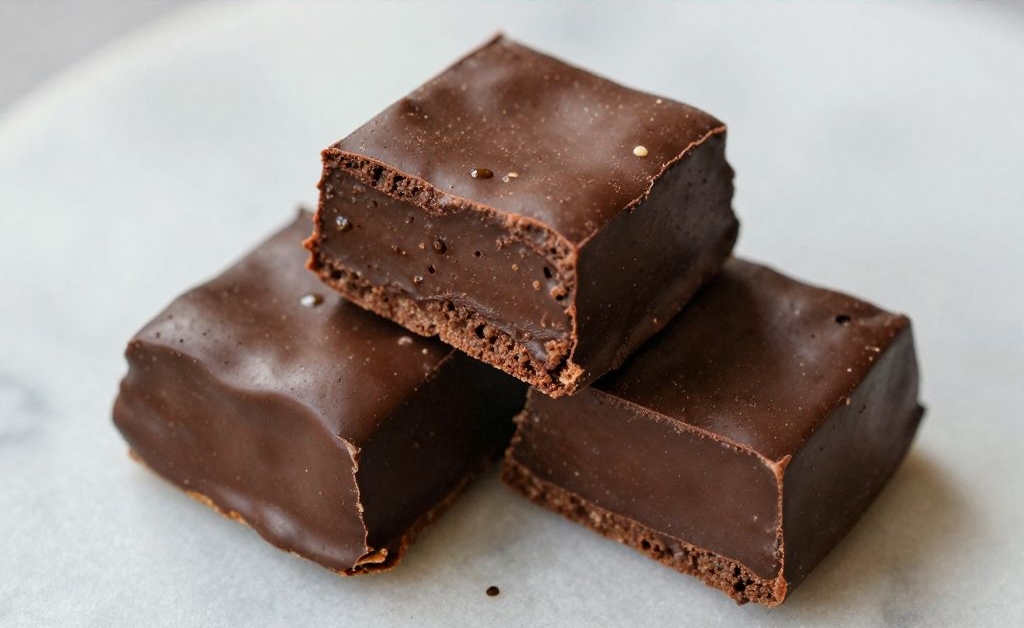

I have a confession. I used to think fudge was either gritty sugar bombs or sad dry bricks from the back of a candy shop. Then I discovered this recipe.
This fantasy fudge is the real deal. It’s so creamy and soft that it literally melts the second it hits your tongue. And the best part? You don’t need a candy thermometer or any fancy skills.
1. Allergens
This fudge contains dairy (butter, sweetened condensed milk, and heavy cream) and soy (if you use regular chocolate chips). It also has eggs? Nope – no eggs in classic fantasy fudge, so we’re good there.
It is gluten-free if you use certified gluten-free chocolate chips. But check your marshmallow fluff label – most brands are gluten-free, but a few aren’t. Potential allergens to watch: Some people react to the stabilizers in marshmallow creme, but that’s rare.
2. Ingredient notes & substitutions
Sweetened condensed milk is non-negotiable – don’t grab evaporated milk by mistake. Evaporated milk has no sugar and your fudge will turn into a oily mess. I’ve done it. I cried.
For the chocolate: Use good quality semi-sweet or milk chocolate chips. Guittard, Ghirardelli, or even Trader Joe’s brand work beautifully. Avoid generic store-brand chips – they have too many stabilizers and won’t melt into that velvety texture.
Butter: Salted or unsalted? Unsalted gives you control, but salted is fine if that’s what you have. Just skip any added salt in the recipe. Marshmallow fluff is the secret to the “fantasy” texture. Jet-Puffed is the classic, but store brand works too.
Need a dairy-free version? Use vegan butter, full-fat coconut condensed milk (Nature’s Charm makes a good one), and dairy-free chocolate chips. The texture will be slightly softer, but still dreamy.
Short on marshmallow fluff? You can use 2 cups of mini marshmallows, but you’ll need to stir constantly until they fully dissolve. The fluff is smoother, so I prefer it.
3. Pro tips
Do not boil the mixture for more than 5 minutes. If you over-boil, the sugar crystals will form and your fudge will be grainy. Set a timer the second it starts bubbling.
Use a heavy-bottomed saucepan – thin pans cause hot spots and scorched chocolate. Your fudge will taste like burnt disappointment otherwise.
Line your pan with parchment paper AND leave overhang on two sides. Those paper handles are how you’ll lift the whole brick out without breaking it.
Let the fudge cool completely at room temperature before moving it to the fridge. If you rush it into the cold, condensation will form and make the top sticky and weird.
When you stir, use a silicone spatula and scrape the bottom constantly. Chocolate loves to hide down there and burn.
Cut it with a hot knife – run your knife under hot water, dry it, then slice. Wipe the blade clean between each cut. This gives you those perfect Instagram-worthy squares.
4. Storage & make-ahead (fridge/freezer)
Store in an airtight container at room temperature for up to 1 week. Keep it in a cool spot away from sunlight. If your kitchen runs hot (above 72°F), pop it in the fridge instead.
Fridge life: Up to 3 weeks. Just bring it to room temp for 15 minutes before eating – cold fudge is sad, firm fudge. Freezer for up to 3 months. Wrap individual squares in wax paper, then toss them in a freezer bag.
To thaw, move to the fridge overnight, then let sit on the counter for 20 minutes. Do not microwave frozen fudge unless you want a puddle of sadness.
5. Serving suggestions
Serve these little velvet squares with a cup of strong black coffee or a cold glass of oat milk. For a holiday platter, dust them with flaky sea salt or crushed candy canes. They also make incredible ice cream toppings – just crumble a piece over vanilla bean gelato.
6. Use your leftovers
Leftover fudge? I’m sorry, I don’t understand the question. But if you somehow have extra, crumble it into brownie batter before baking. The fudge pockets melt into gooey chocolate lava.
Mix chopped fudge into pancake batter for chocolate chip pancakes on steroids. Or melt it down with a splash of heavy cream to make a luxurious hot fudge sauce for sundaes.
Freeze the crumbs and use them as a topping for cheesecake or trifle. You can even stir small chunks into your morning oatmeal – don’t knock it till you’ve tried it.
Give it away as gifts. Wrap 6 squares in cellophane with a ribbon. People will think you spent hours at a pastry school.
7. Common mistakes & how to fix them
Grainy fudge: You boiled too long or stirred too much during boiling. Next time, use a timer and resist the urge to whisk. For already grainy fudge? Sorry, no fix – but you can melt it back down with a little milk and use it as a sauce.
Fudge didn’t set: You under-boiled or mis-measured the condensed milk. Pop it in the fridge for 2 hours. If still runny, scrape it into a jar and call it “fantasy fudge sauce.” No one will complain.
8. Variations by diet or flavor profile
Peppermint bark fudge: Add 1/2 teaspoon peppermint extract after removing from heat, then top with crushed candy canes. Salted caramel fantasy: Swirl in 1/4 cup of dulce de leche and sprinkle with Maldon salt.
Vegan version: Use vegan butter, coconut condensed milk, and oat-based chocolate chips. The texture is slightly softer, so freeze for an extra hour before cutting. Keto fantasy fudge: Replace sugar-free chocolate chips (Lily’s), allulose sweetened condensed milk, and omit marshmallow fluff (use 1/4 cup heavy cream instead). It’s different but still good.
Peanut butter chocolate swirl: Drop spoonfuls of creamy peanut butter on top of the fudge before it sets, then swirl with a knife. Mexican hot chocolate: Add 1 teaspoon cinnamon, 1/4 teaspoon cayenne, and a dash of vanilla.
9. Why this recipe works / The science
Sweetened condensed milk is the backbone. Its high sugar and low water content prevents ice crystals from forming, giving you that dense but creamy bite. Marshmallow fluff introduces air and stabilizers that keep the fudge from getting hard and crumbly.
The combination of butter and heavy cream adds fat, which coats the sugar crystals and makes them feel silky instead of sandy on your tongue. That’s the “melts on your tongue” effect – your saliva breaks down the fat quickly, releasing flavor.
Why no candy thermometer? Because the marshmallow fluff acts as a buffer. You only need a gentle boil for 5 minutes to dissolve the sugar. Anything longer triggers rapid crystallization. The cooling phase is critical: as fudge sits, sugar molecules re-arrange into a stable network. Cutting too early = sticky mess. Waiting 2 hours = perfect slice.
10. Frequently Asked Questions (FAQ)
Can I double this recipe? Yes, but use a larger pot (at least 6 quarts) and increase boil time to 6 minutes. Pour into a 9×13 pan instead of 8×8.
Why is my fudge oily on top? Your chocolate got too hot or you used cheap chocolate. Try a better brand next time and keep the heat at medium. Can I use chocolate bars instead of chips? Yes, chop 12 oz of good dark chocolate into small pieces. They melt more evenly than chips.
How do I know when it’s done boiling? Look for a steady, rolling bubble that covers the entire surface. Not just a few lazy burps – a full eruption. Then start your 5-minute timer.
11. Call to action
If you make this fantasy fudge (and please do), drop a comment below with your flavor twist. Better yet, share a photo on Pinterest and tag me – I love seeing your sticky, chocolatey success stories. And subscribe to the blog so you never miss a melt-in-your-mouth moment.
Alright, home cook. You’ve got the science, the secrets, and the sarcasm. Now go make the creamiest fudge of your life. No candy thermometers. No tears. Just velvety, dreamy squares that disappear way too fast.
Here’s the exact recipe. Follow it once, then start experimenting.
Recipe Name: Creamy Velvety Fantasy Fudge
Servings: 36 (1-inch squares)
Estimated Cost Per Serving: $0.35
Prep Time: 10 minutes
Cook Time: 10 minutes
Total Time: 2 hours 20 minutes (includes cooling)
Course: Dessert
Cuisine: American
Calories Per Serving: 135
Diet: None (contains dairy; gluten-free if using GF chocolate)
Difficulty: Easy
Ingredients
- 3 cups (510g) semi-sweet chocolate chips
- 1 can (14 oz / 397g) sweetened condensed milk
- 1/4 cup (56g) unsalted butter
- 2 tablespoons (30ml) heavy cream
- 1 jar (7 oz / 198g) marshmallow fluff (about 1 3/4 cups)
- 1 teaspoon vanilla extract
- Pinch of salt (only if using unsalted butter)
Instructions
- Line an 8×8-inch square baking pan with parchment paper, leaving overhang on two opposite sides. Lightly butter the paper.
- In a heavy-bottomed saucepan over medium-low heat, combine the chocolate chips, sweetened condensed milk, butter, and heavy cream. Stir constantly with a silicone spatula until the chocolate is fully melted and the mixture looks glossy – about 4 minutes.
- Add the marshmallow fluff and stir until completely smooth. No white streaks allowed.
- Turn the heat up to medium. Bring the mixture to a gentle, rolling boil – bubbles should cover the entire surface. Set a timer for exactly 5 minutes. Stir constantly, scraping the bottom and sides.
- After 5 minutes, remove the pan from heat. Quickly stir in the vanilla extract and salt (if using). The fudge will look thick and shiny.
- Immediately scrape the fudge into the prepared pan. Spread it evenly with a spatula – don’t worry if the top isn’t perfectly flat.
- Let the fudge cool at room temperature for 1 hour. Then transfer to the refrigerator and chill for at least 1 more hour, or until firm to the touch.
- Lift the fudge out using the parchment overhang. Place on a cutting board. Run a long knife under hot water, dry it, then slice into 36 small squares. Wipe the blade clean between cuts.
- Serve at room temperature. Store leftovers in an airtight container at cool room temp for up to a week, or in the fridge for 3 weeks.